本次使用VMware虚拟机软件来安装RedHat Enterprise Linux 8.0操作系统(简称为 RHEL8.0操作系统)
提供VMware Workstation 16 Pro版本,Red Hat8系统镜像,百度网盘链接如下:
VMware Workstation 16 Pro版本(含激活码)链接:https://pan.baidu.com/s/1QKOmJeP4pz2jd_993Ta2pw 提取码:znyd
Red Hat8系统镜像下载链接:https://pan.baidu.com/s/1EfbKJj5Dyb8iefEGidE0Mg 提取码:znyd
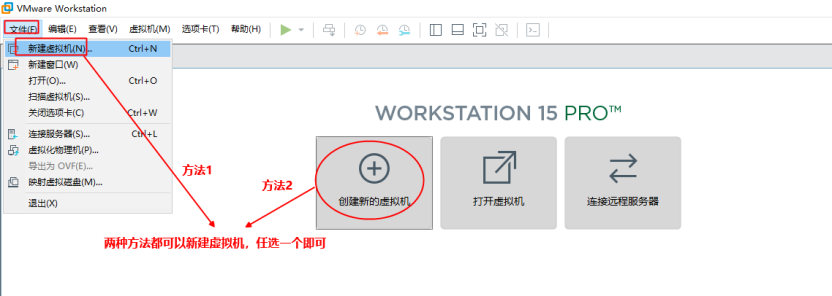
1.打开VMware虚拟机,创建新的虚拟机
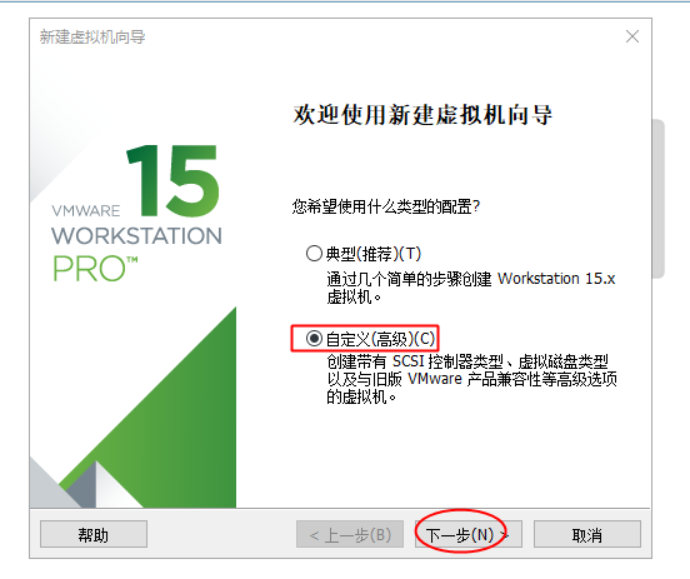
选择:自定义(高级)
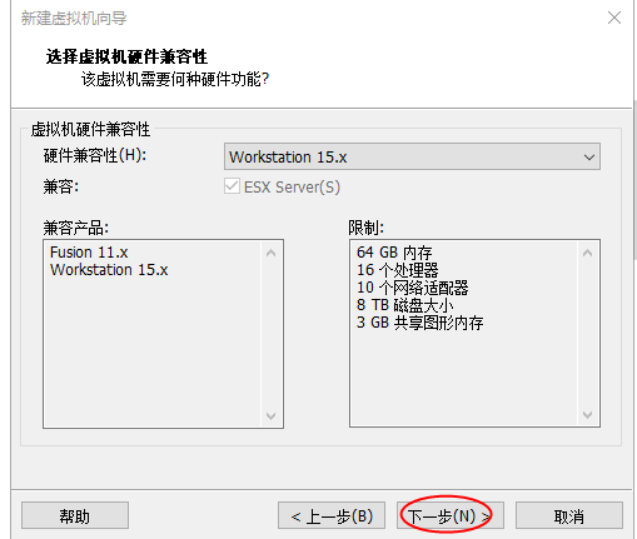
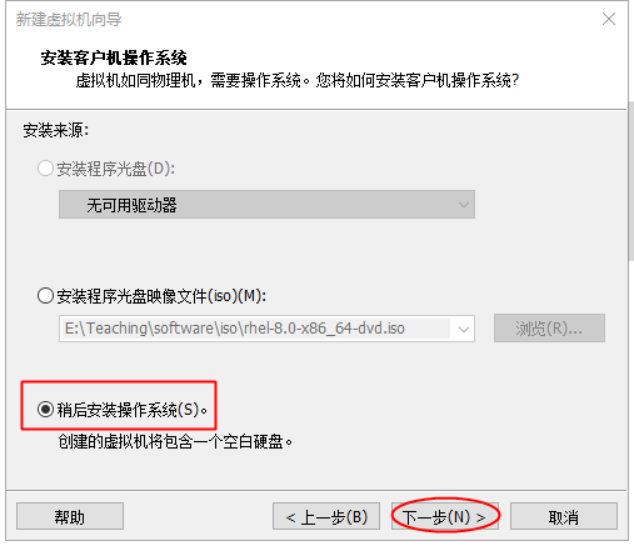
选择:稍后安装操作系统(S)
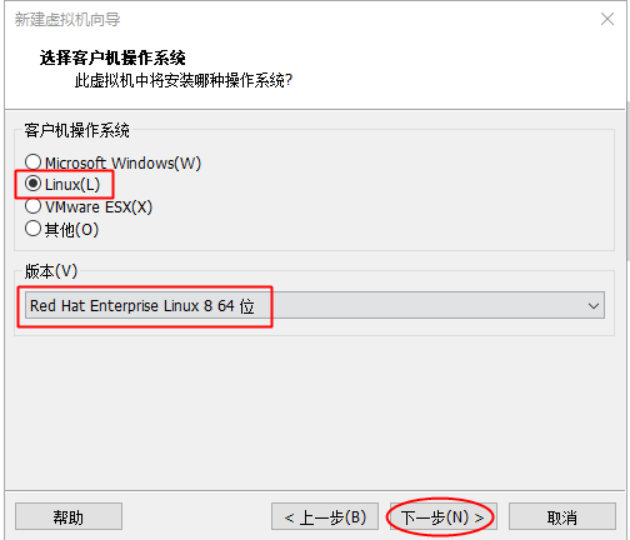
客户机操作系统选择"Linux",版本选择"Red Hat Enterprise Linux 8 64位"
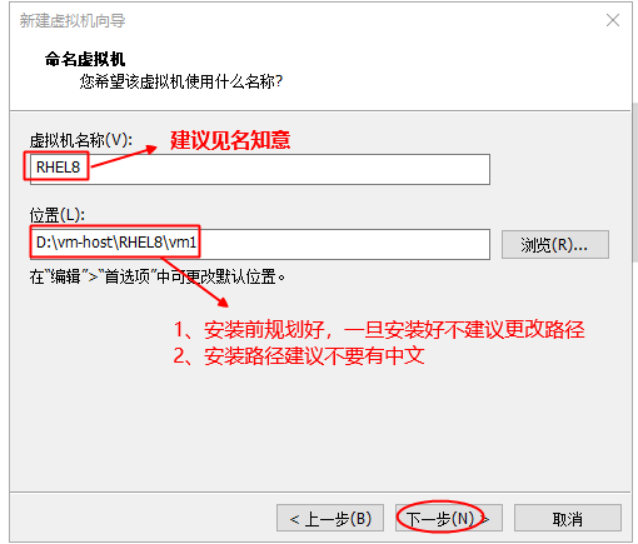
命名虚拟机
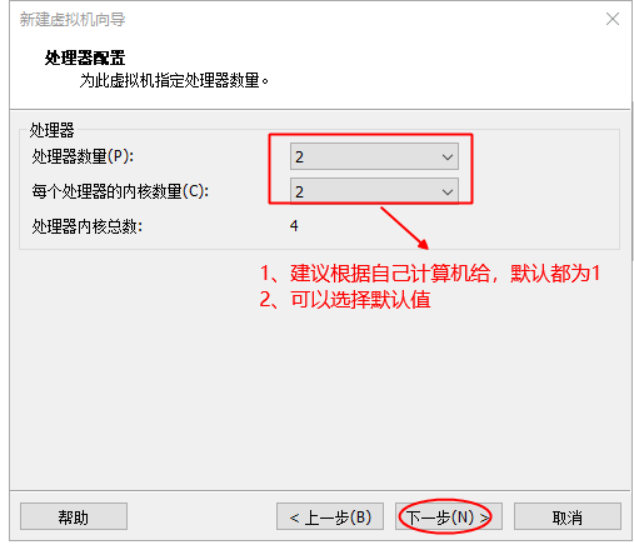
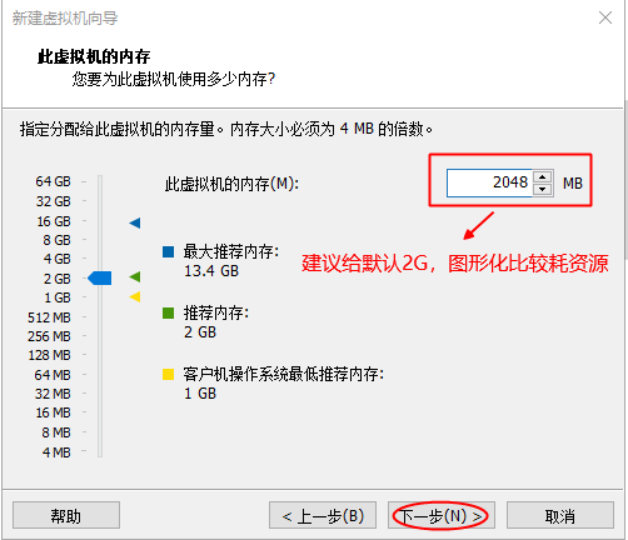
虚拟机配置
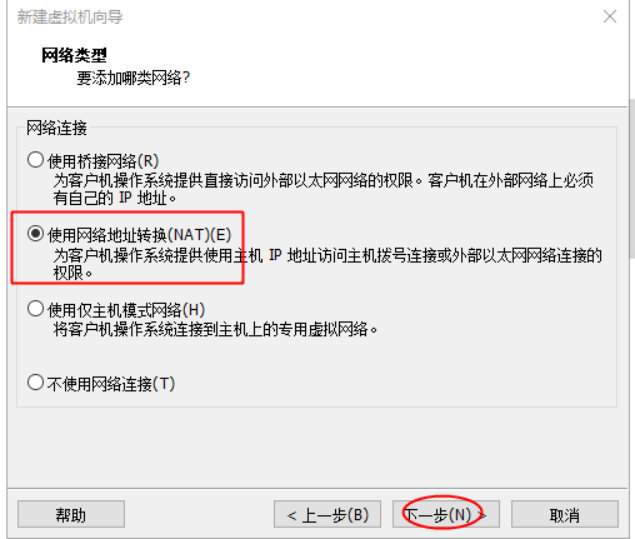
网络类型
选择 使用网络地址转换(NAT),这个比较简单实现Windows主机跟Linux虚拟机网络打通。
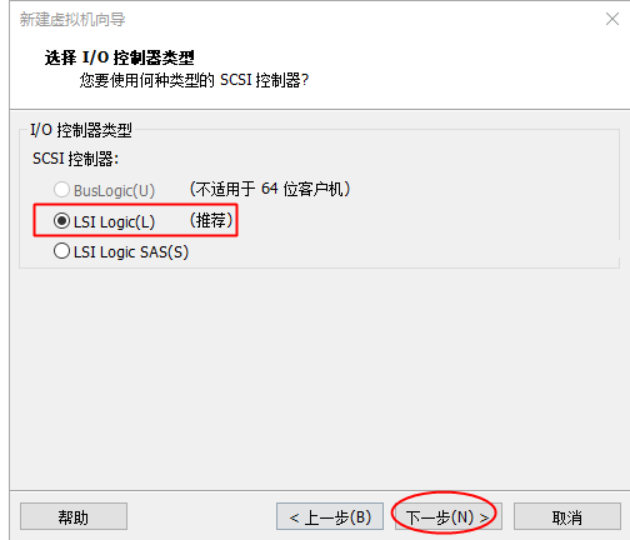
选择 I/O 控制器类型 选择:推荐的 LSI Logic
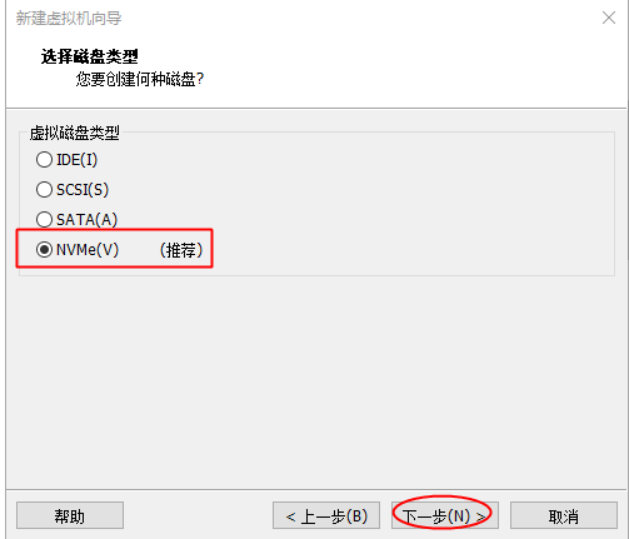
选择磁盘类型 选择:推荐的 NVMe(V)
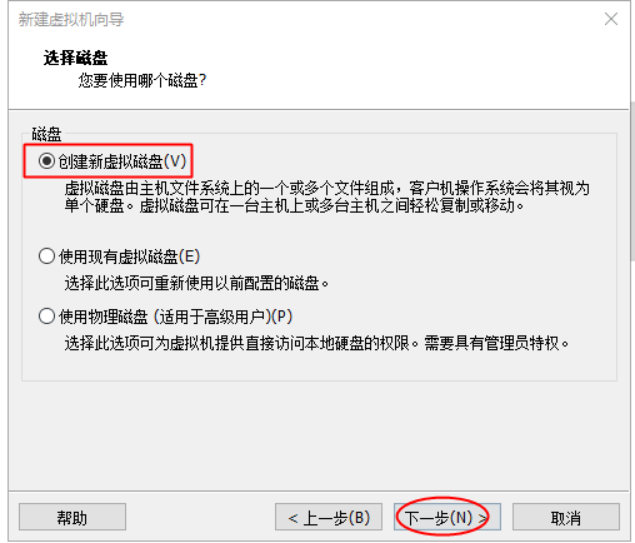
选择磁盘 创建新虚拟磁盘 ==> 磁盘大小:默认20G(可根据需要调整大小)(其他选项默认)
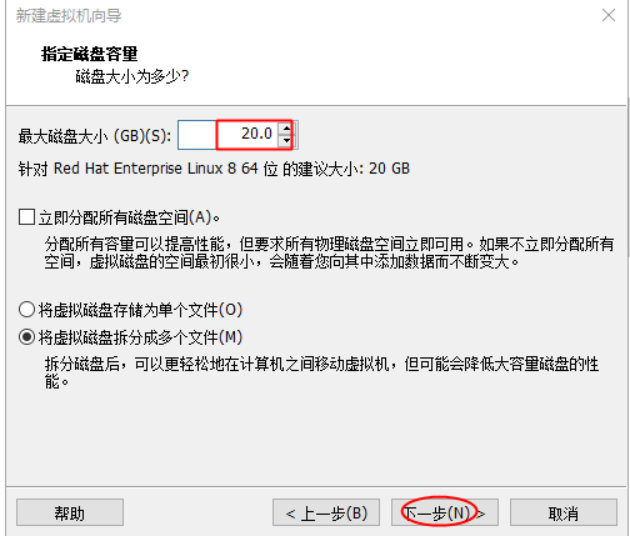
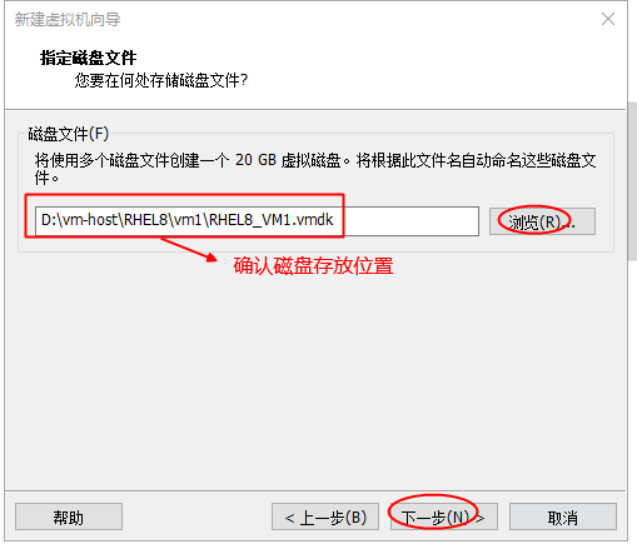
指定磁盘文件位置 (默认安装到命名时选择的位置)(亦可自己选到指定位置)
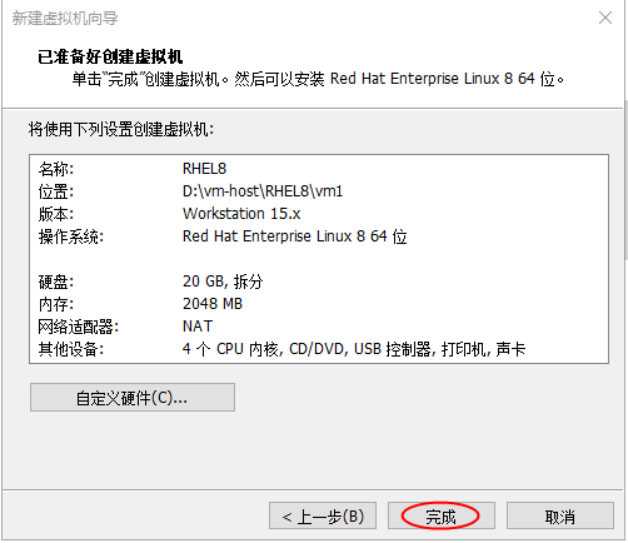
创建好的虚拟机配置
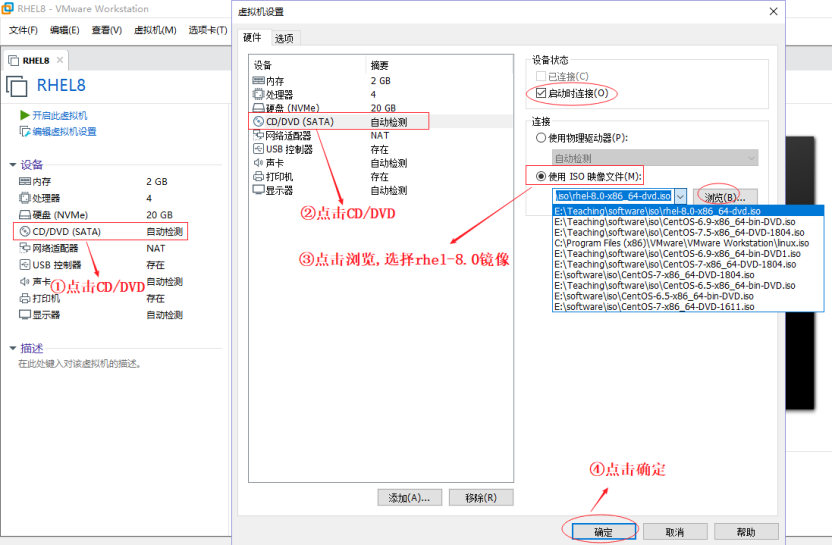
2.选择镜像文件放入虚拟光驱
选中创建的虚拟机打开属性,在虚拟机设置中选择CD/DVD 使用ISO镜像文件,添加下载好的RHEL8 ISO文件
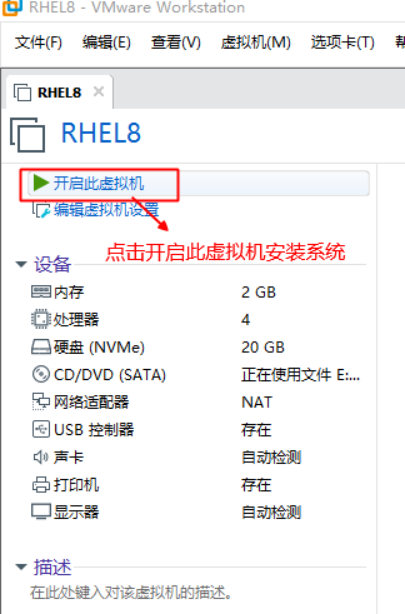
3.开机安装系统
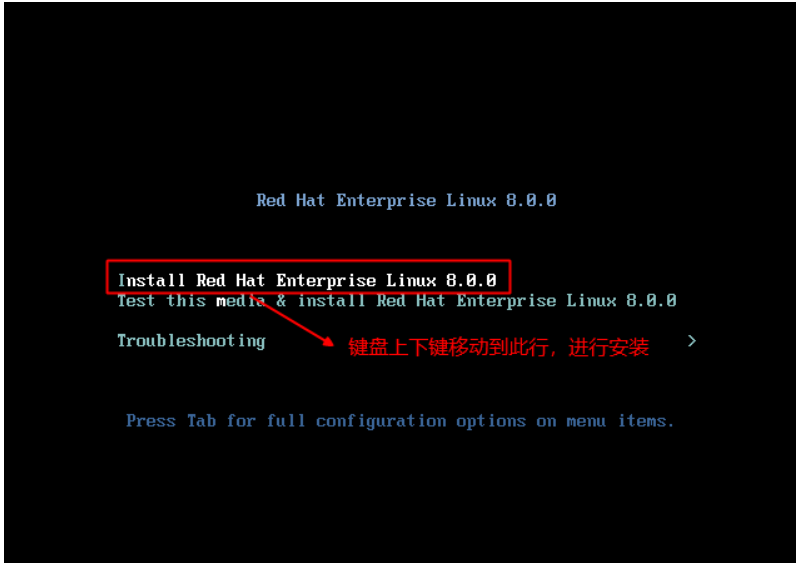
开启虚拟机,选择第一项:Install Red Hat Enterprise Linux 8.0.0 按Enter键
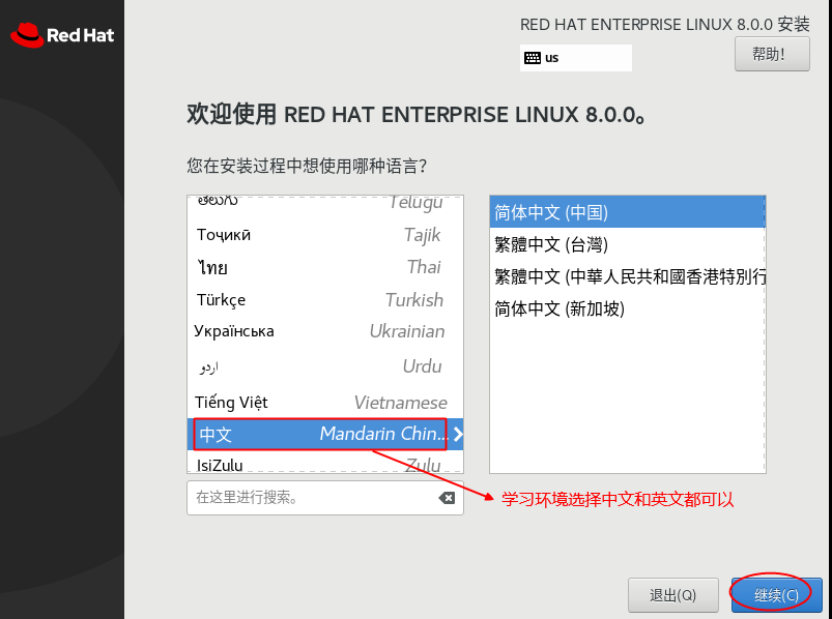
选择语言,我这里选择中文
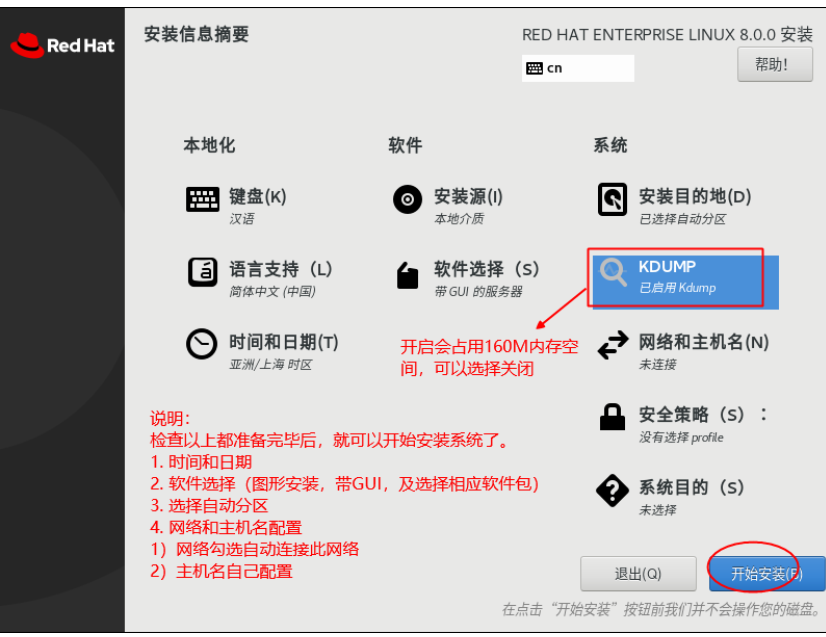
安装信息摘要选择(分别选择)
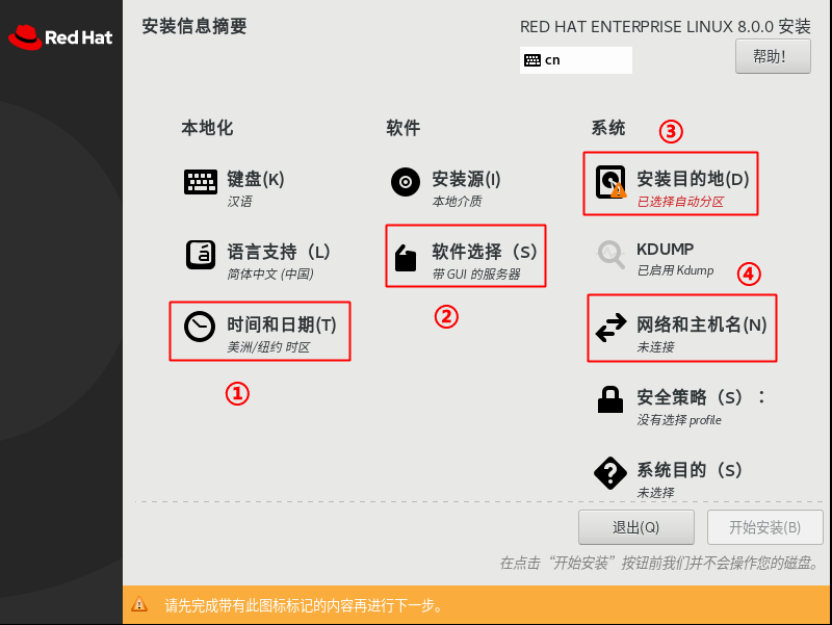
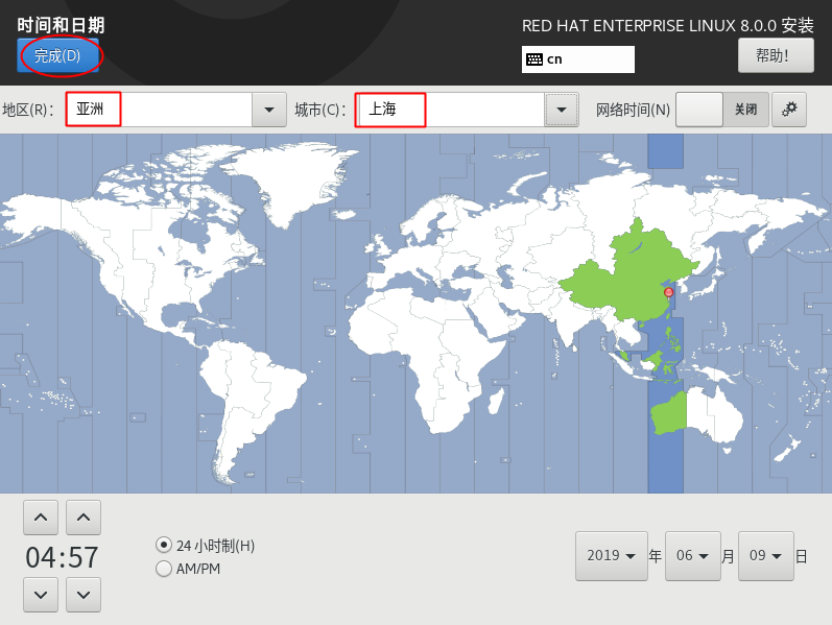
时间和日期 选择上海
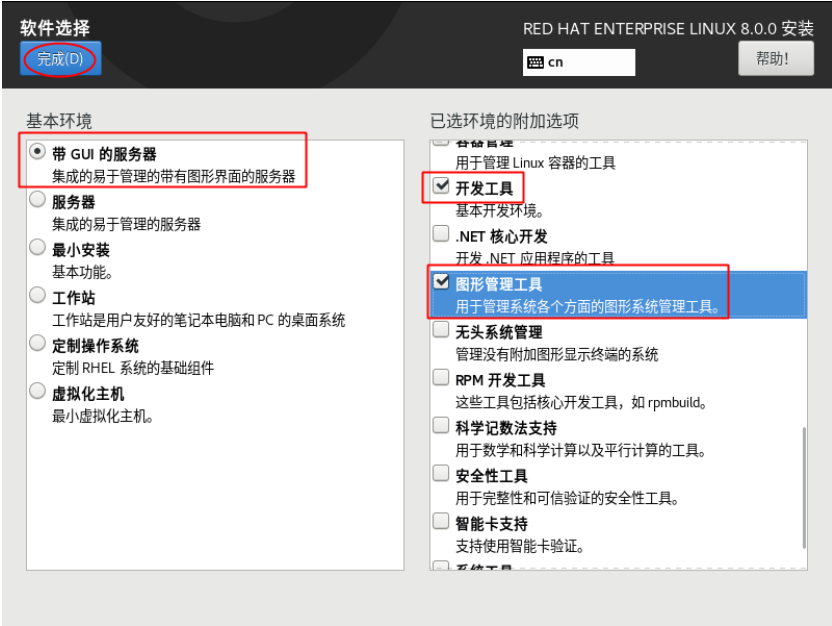
软件选择 (根据自己需要选择)
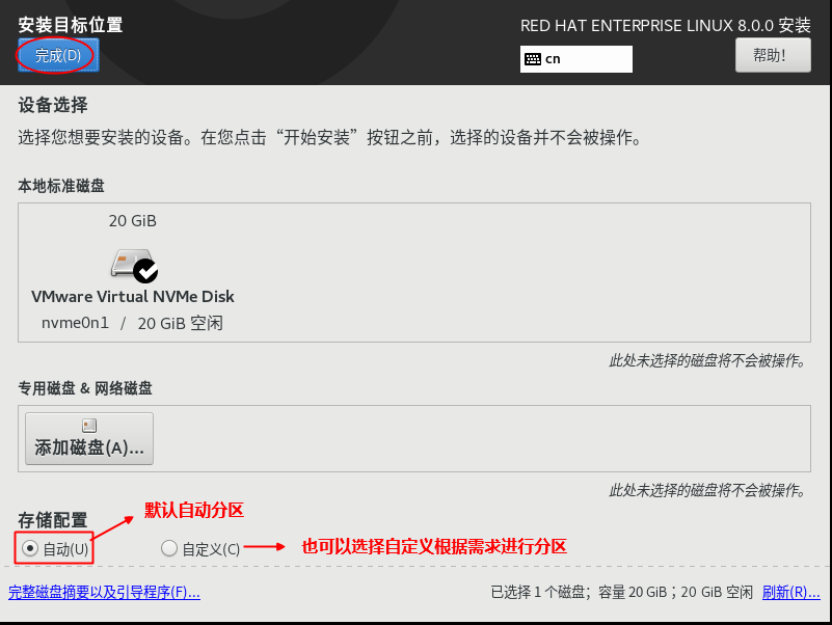
安装目标位置(可选择自动 或 自定义)
网络和主机名 开启即可自动获取ip地址
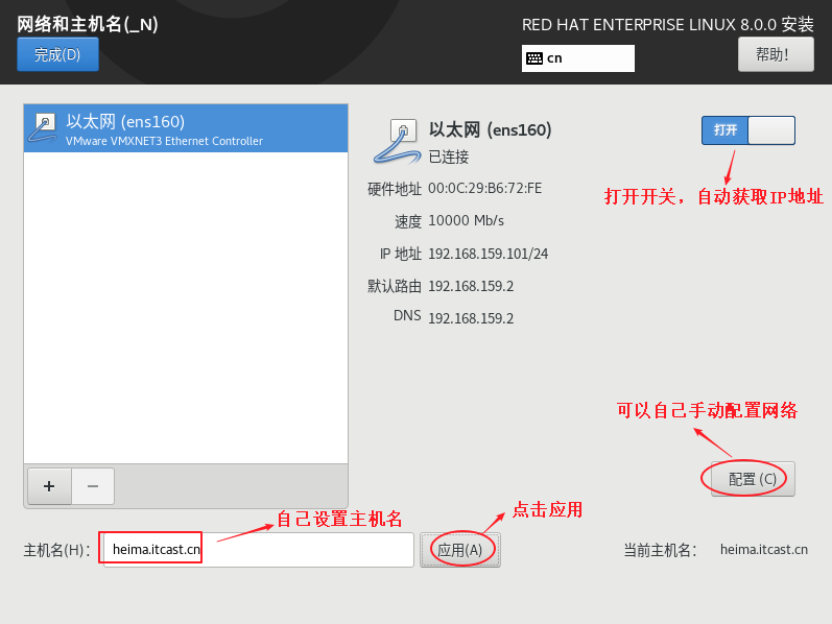
配置
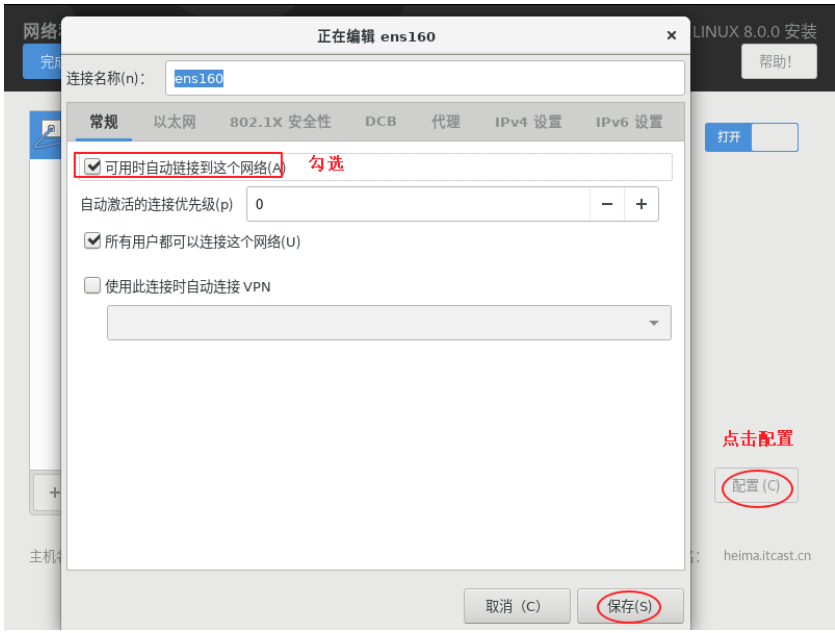
配置完成 开始安装
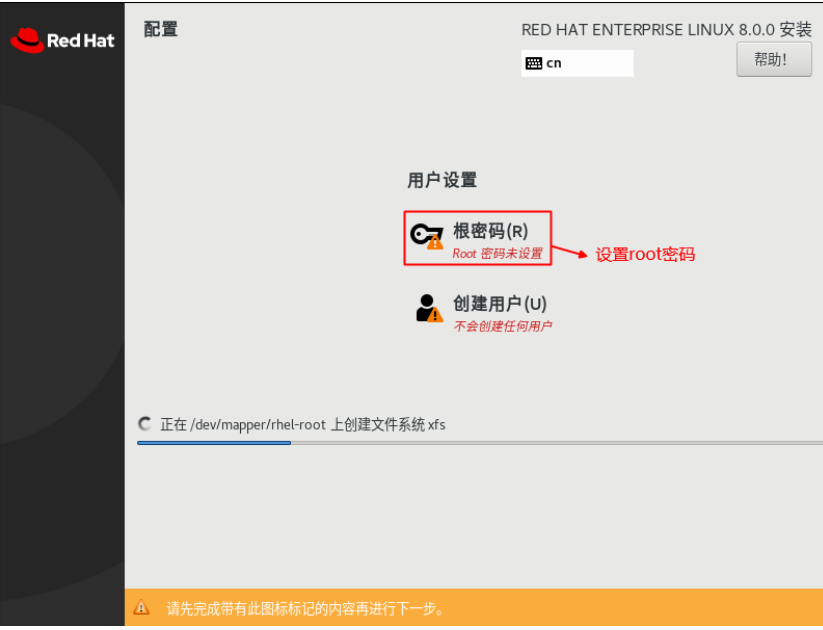
安装中 设置root密码
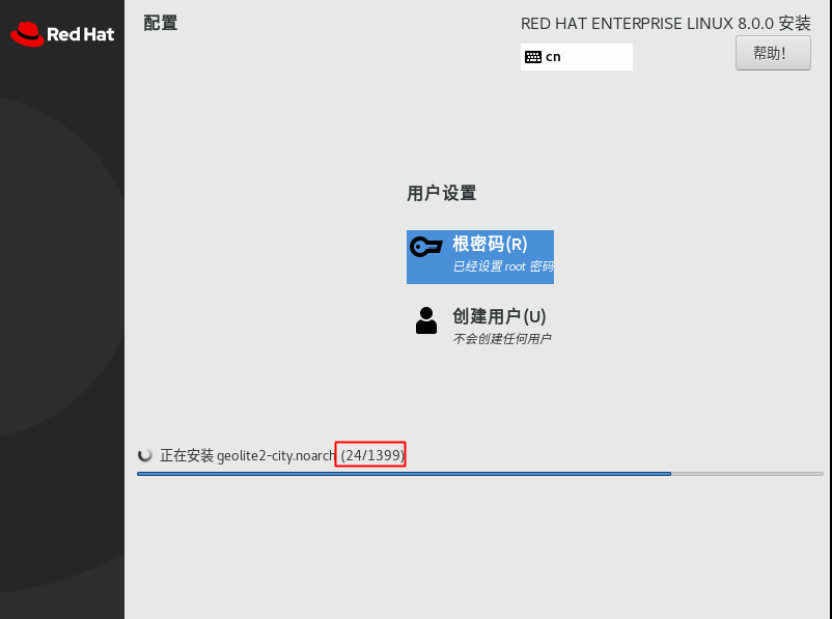
坐等安装完成
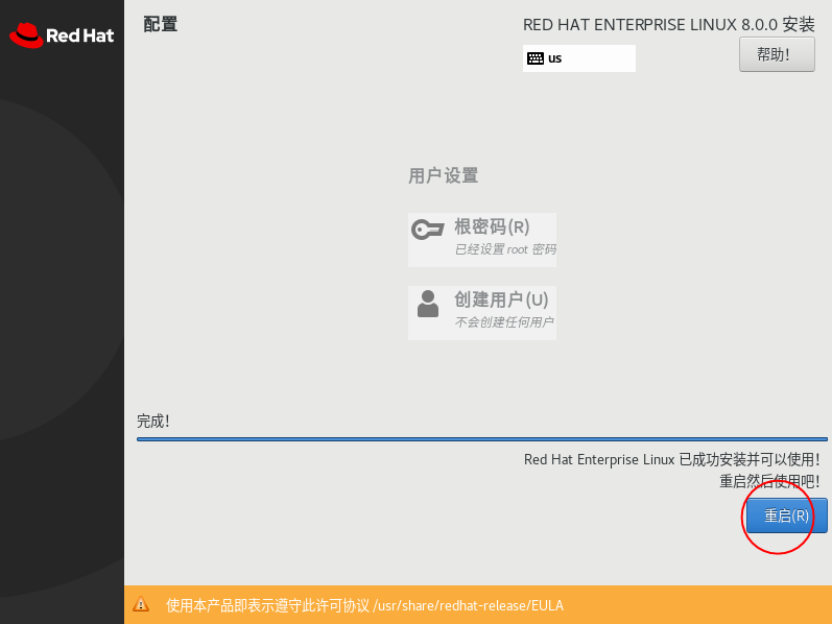
安装完成需 重启
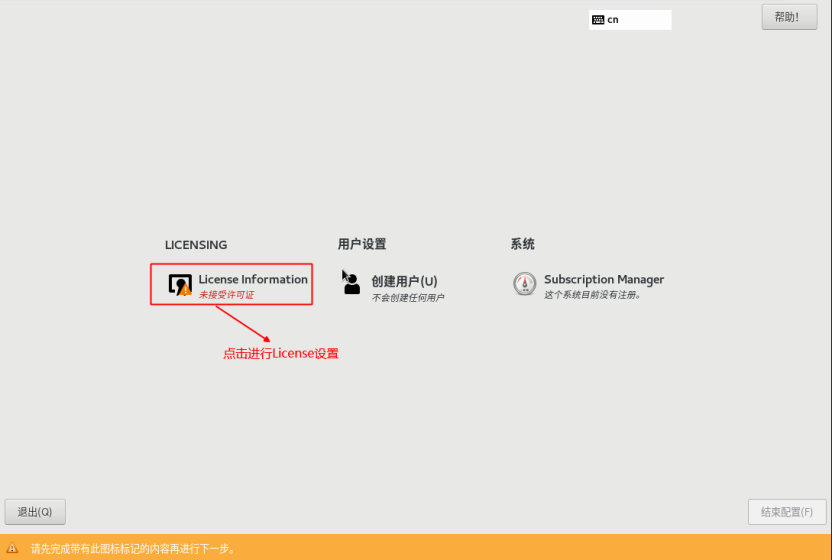
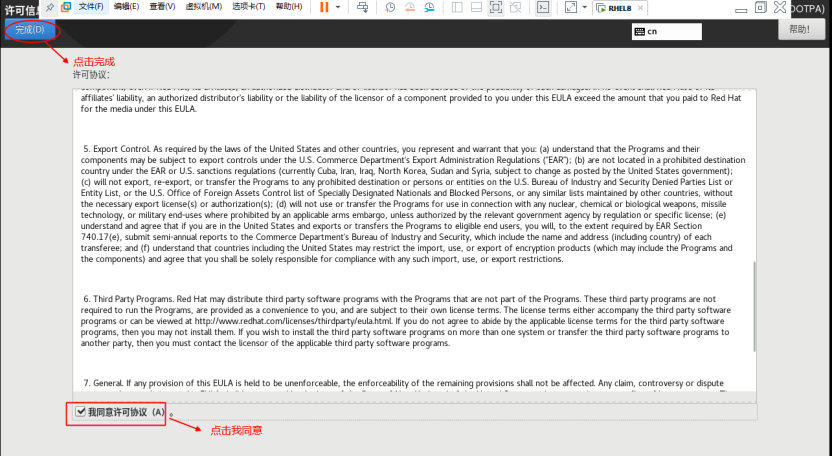
进行license设置
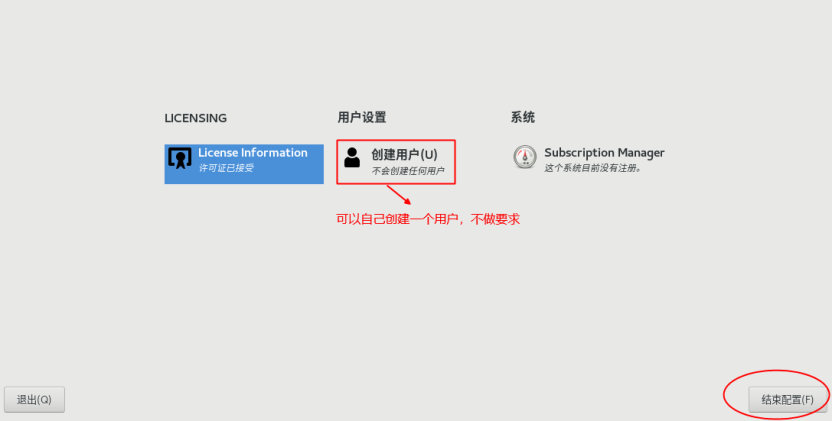
可选择是否创建用户
3.登录系统
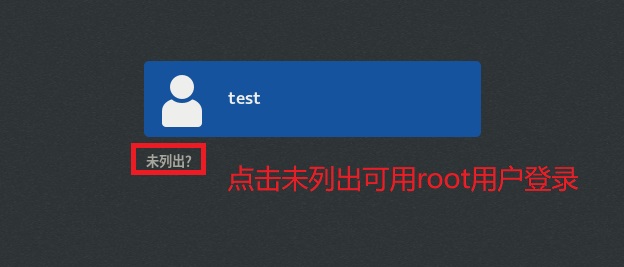
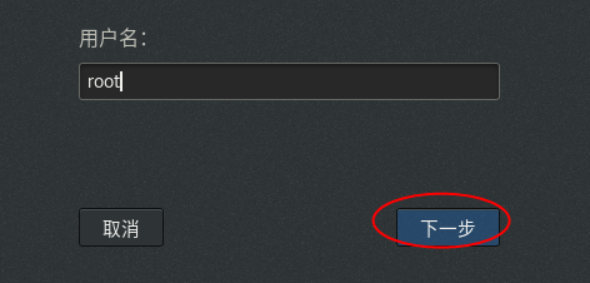

按照提示进行一些基本配置
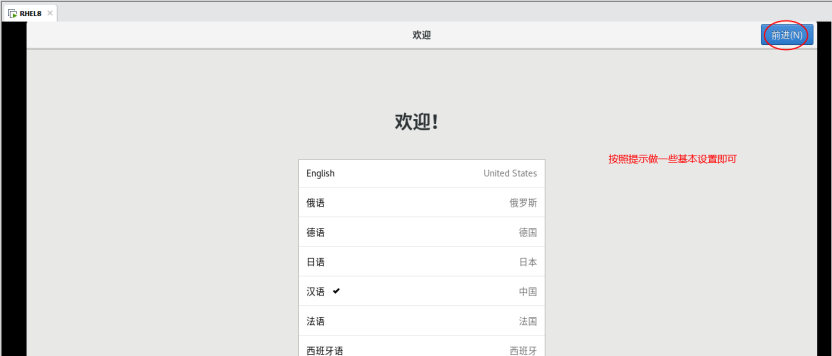
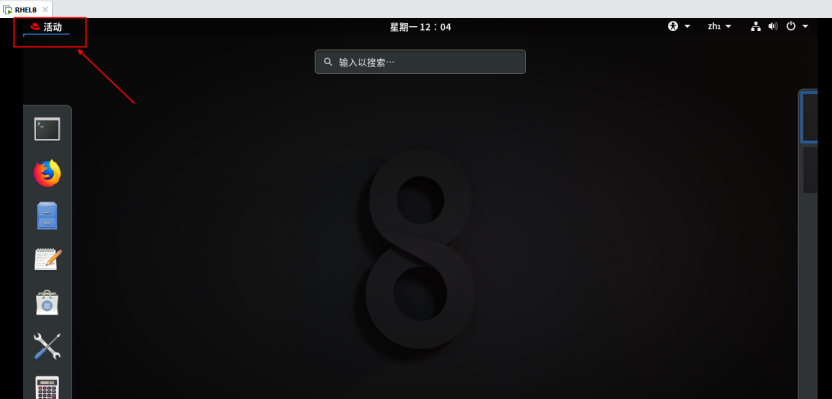
4.管理虚拟机快照和克隆
快照
拍摄快照
方法一:虚拟机 --> 快照 --> 拍摄快照
方法二:选择虚拟机 --> 点击拍摄快照图标
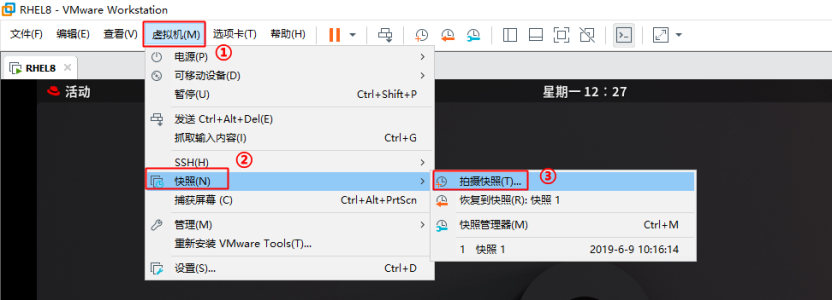
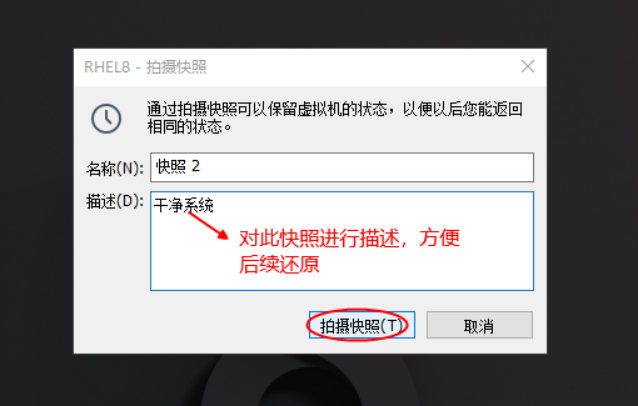
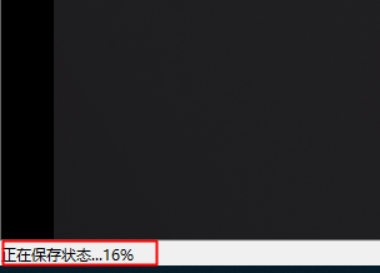
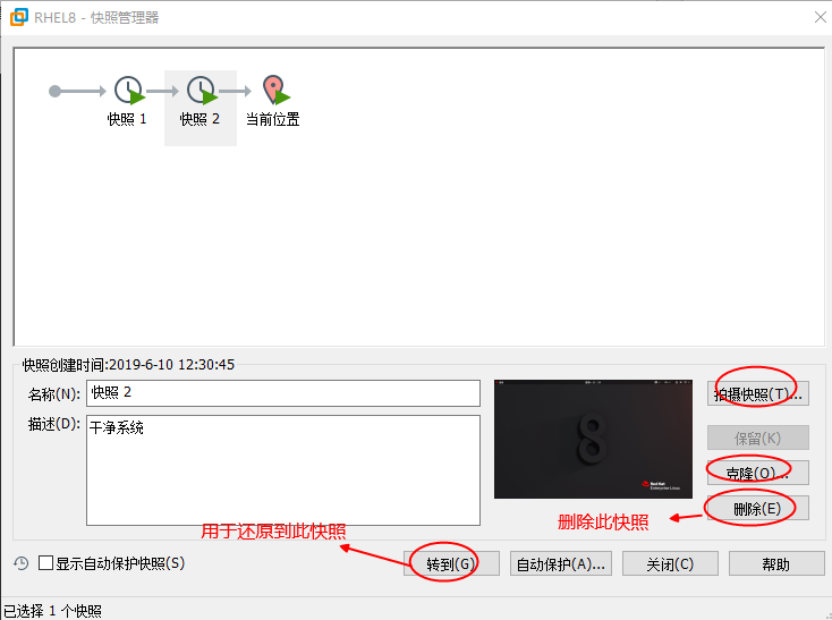
管理快照
方法一:虚拟机 --> 快照 --> 快照快照管理器
方法二:选择虚拟机 --> 点击管理快照图标

克隆
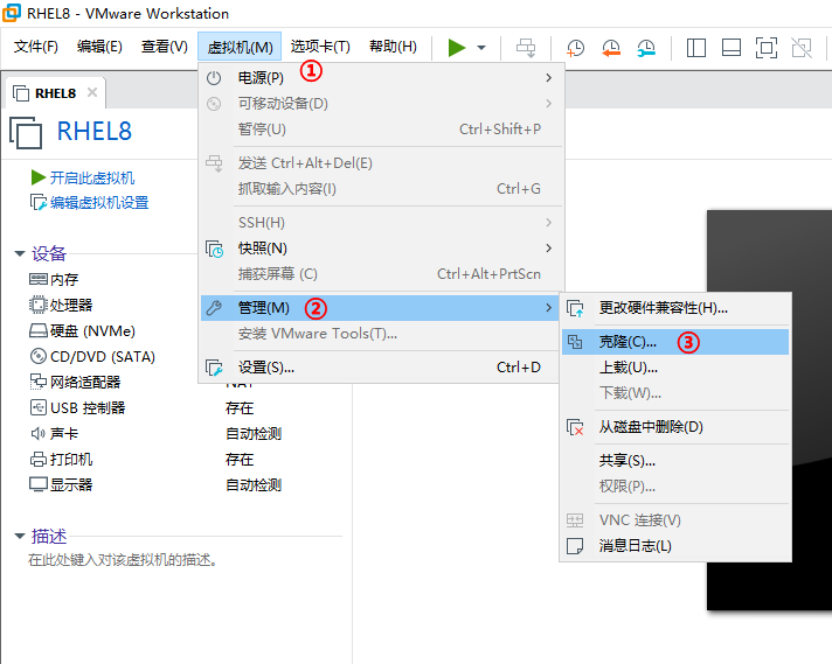
虚拟机 --> 管理 --> 克隆
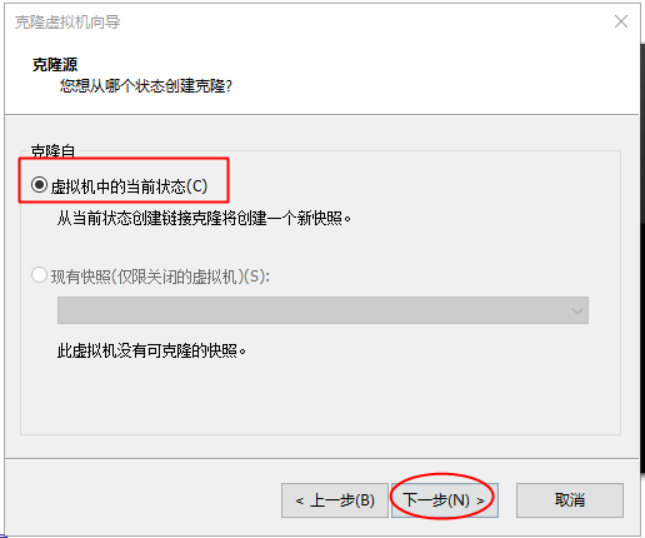
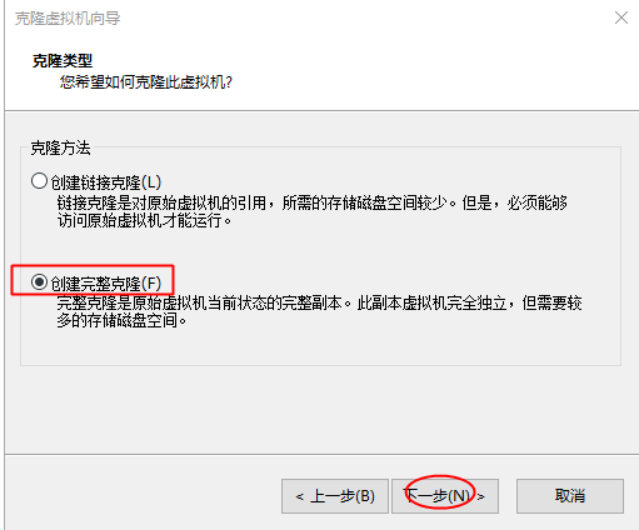
选择 创建完整克隆
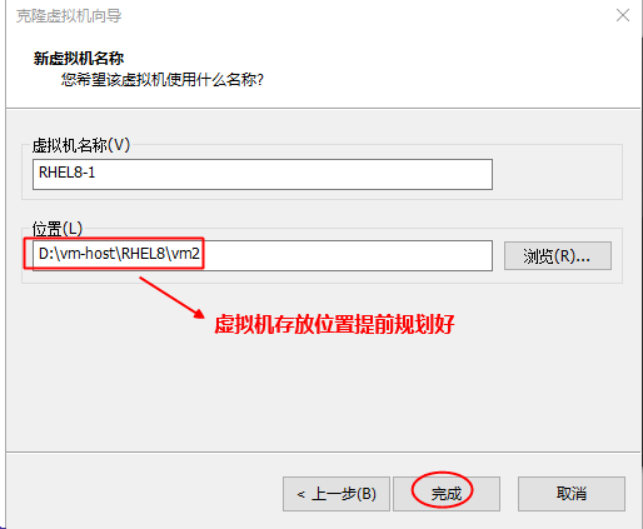
克隆出 新虚拟机名称
5.关机和重启系统命令
关机和重启操作只有管理员可以执行!
1、关机命令
shutdown -h now #立刻马上关机
shutdown -h 60 #60分钟(1个小时)后关闭
说明:如果取消在另一终端使用shutdown -c 或者直接ctrl+c
2、重启命令
reboot #重启系统
shutdown -r now #立刻马上重启
shutdown -r 30 #30分钟后重启系统
6、自定义配置Yum源
6.1上传操作系统镜像
redhat8镜像已经在前言中给了,先看下当前操作系统目录空间大小:
[root@rehat8 ~]# df -h
文件系统        容量  已用  可用 已用% 挂载点
devtmpfs        1.8G     0  1.8G    0% /dev
tmpfs           1.9G     0  1.9G    0% /dev/shm
tmpfs           1.9G  9.8M  1.8G    1% /run
tmpfs           1.9G     0  1.9G    0% /sys/fs/cgroup
/dev/nvme0n1p1   25G  5.3G   20G   21% /
tmpfs           371M   44K  371M    1% /run/user/0
/dev/sr0         11G   11G     0  100% /run/media/root/RHEL-8-6-0-BaseOS-x86_64
可以看到/目录下有20G空间可用,并且操作系统镜像这时候是被挂载到了/dev/sr0下,这不能忍,先卸载掉!
[root@rehat8 ~]# umount /dev/sr0
[root@rehat8 ~]# df -h
文件系统        容量  已用  可用 已用% 挂载点
devtmpfs        1.8G     0  1.8G    0% /dev
tmpfs           1.9G     0  1.9G    0% /dev/shm
tmpfs           1.9G  9.8M  1.8G    1% /run
tmpfs           1.9G     0  1.9G    0% /sys/fs/cgroup
/dev/nvme0n1p1   25G  5.3G   20G   21% /
tmpfs           371M   44K  371M    1% /run/user/0
这样看着顺眼多了,接下来创建个自定义目录/zyd 并通过ftp等工具将镜像上传到那个目录下:
[root@rehat8 ~]# cd /
[root@rehat8 /]# ls
bin  boot  dev  etc  home  lib  lib64  media  mnt  opt  proc  root  run  sbin  srv  sys  tmp  usr  var
[root@rehat8 /]# mkdir zyd
[root@rehat8 /]# ll /
总用量 28
lrwxrwxrwx.   1 root root    7 6月  21 2021 bin -> usr/bin
dr-xr-xr-x.   5 root root 4096 1月  29 01:51 boot
drwxr-xr-x.  19 root root 3180 1月  29 02:24 dev
drwxr-xr-x. 144 root root 8192 1月  29 02:03 etc
drwxr-xr-x.   3 root root   25 1月  29 02:03 home
lrwxrwxrwx.   1 root root    7 6月  21 2021 lib -> usr/lib
lrwxrwxrwx.   1 root root    9 6月  21 2021 lib64 -> usr/lib64
drwxr-xr-x.   2 root root    6 6月  21 2021 media
drwxr-xr-x.   3 root root   18 1月  29 00:29 mnt
drwxr-xr-x.   2 root root    6 6月  21 2021 opt
dr-xr-xr-x. 362 root root    0 1月  29 02:24 proc
dr-xr-x---.  15 root root 4096 1月  29 02:41 root
drwxr-xr-x.  43 root root 1260 1月  29 02:26 run
lrwxrwxrwx.   1 root root    8 6月  21 2021 sbin -> usr/sbin
drwxr-xr-x.   2 root root    6 6月  21 2021 srv
dr-xr-xr-x.  13 root root    0 1月  29 02:24 sys
drwxrwxrwt.  22 root root 4096 1月  29 02:28 tmp
drwxr-xr-x.  13 root root  158 1月  29 00:52 usr
drwxr-xr-x.  21 root root 4096 1月  29 01:51 var
drwxr-xr-x.   2 root root    6 1月  29 02:48 zyd
[root@rehat8 /]#
通过ftp等工具将镜像上传到那个zyd目录下:检查一下
[root@rehat8 zyd]# ll
总用量 11197440
-rw-r--r--. 1 root root 11466178560 1月  29 02:52 rhel-8.6-x86_64-dvd.iso
镜像已经上传上来了!
6.2、挂载操作系统镜像
接下来我将镜像挂载到/mnt目录下
挂载前
[root@rehat8 zyd]# df -h
文件系统        容量  已用  可用 已用% 挂载点
devtmpfs        1.8G     0  1.8G    0% /dev
tmpfs           1.9G     0  1.9G    0% /dev/shm
tmpfs           1.9G  9.6M  1.8G    1% /run
tmpfs           1.9G     0  1.9G    0% /sys/fs/cgroup
/dev/nvme0n1p1   25G   16G  9.2G   64% /
tmpfs           371M   12K  371M    1% /run/user/42
tmpfs           371M     0  371M    0% /run/user/0
以只读模式挂载
[root@rehat8 zyd]# mount -o loop /zyd/rhel-8.6-x86_64-dvd.iso /mnt/
mount: /mnt: WARNING: device write-protected, mounted read-only.
[root@rehat8 zyd]#
[root@rehat8 zyd]#
挂载后再看
[root@rehat8 zyd]# df -h
文件系统        容量  已用  可用 已用% 挂载点
devtmpfs        1.8G     0  1.8G    0% /dev
tmpfs           1.9G     0  1.9G    0% /dev/shm
tmpfs           1.9G  9.6M  1.8G    1% /run
tmpfs           1.9G     0  1.9G    0% /sys/fs/cgroup
/dev/nvme0n1p1   25G   16G  9.2G   64% /
tmpfs           371M   12K  371M    1% /run/user/42
tmpfs           371M     0  371M    0% /run/user/0
/dev/loop0       11G   11G     0  100% /mnt
检查是否挂载上了
[root@rehat8 zyd]# cd /mnt/
[root@rehat8 mnt]# ls
AppStream  BaseOS  EFI  EULA  extra_files.json  GPL  images  isolinux
  media.repo  RPM-GPG-KEY-redhat-beta  RPM-GPG-KEY-redhat-release  TRANS.TBL
可以看到BaseOS 是基础源AppStream是应用程序源,redhat8里面,他的所有rpm包被拆分为BaseOS和AppStream两个目录,BaseOS里面存放一些基础应用,AppStream里面存放其他的应用。所以两个都要配置,才能安装全部的iso里的软件。这里系统已经挂载好了,接下来去配置yum。
6.3、配置Yum源
编辑yum配置文件,具体操作见下面:
[root@rehat8 mnt]# cd /etc/yum.repos.d/
[root@rehat8 yum.repos.d]# ls
redhat.repo
[root@rehat8 yum.repos.d]# cat /etc/yum.repos.d/redhat.repo
#
# Certificate-Based Repositories
# Managed by (rhsm) subscription-manager
#
# *** This file is auto-generated.  Changes made here will be over-written. ***
# *** Use "subscription-manager repo-override --help" if you wish to make changes. ***
#
# If this file is empty and this system is subscribed consider
# a "yum repolist" to refresh available repos
[BaseOS]
name=BaseOS
baseurl=file:///mnt/BaseOS
gpgcheck=0
enabled=1
[AppStream]
name=AppStream
baseurl=file:///mnt/AppStream
gpgcheck=0
enabled=1
清理并刷新一下yum缓存
[root@rehat8 yum.repos.d]# yum clean all
正在更新 Subscription Management 软件仓库。
无法读取客户身份
本系统尚未在权利服务器中注册。可使用 subscription-manager 进行注册。
19 文件已删除
[root@rehat8 yum.repos.d]# yum repolist
正在更新 Subscription Management 软件仓库。
无法读取客户身份
本系统尚未在权利服务器中注册。可使用 subscription-manager 进行注册。
仓库 id                                                                                                                                仓库名称
AppStream                                                                                                                              AppStream
BaseOS                                                                                                                                 BaseOS
[root@rehat8 yum.repos.d]#
现在yum源就配置好了,接下来验证一下
6.4、验证(终于快写完了)
我的验证思路:先卸载掉挂载的镜像,然后通过yum安装gcc看看效果(肯定会报错),然后再恢复,再安装(肯定会成功)看看效果!
好,就这么干
6.4.1、卸载镜像
root@rehat8 BaseOS]# cd
[root@rehat8 ~]# df -h
文件系统        容量  已用  可用 已用% 挂载点
devtmpfs        1.8G     0  1.8G    0% /dev
tmpfs           1.9G     0  1.9G    0% /dev/shm
tmpfs           1.9G  9.6M  1.8G    1% /run
tmpfs           1.9G     0  1.9G    0% /sys/fs/cgroup
/dev/nvme0n1p1   25G   16G  9.1G   64% /
tmpfs           371M   12K  371M    1% /run/user/42
tmpfs           371M     0  371M    0% /run/user/0
/dev/loop0       11G   11G     0  100% /mnt
[root@rehat8 ~]# umount /mnt
[root@rehat8 ~]# df -h
文件系统        容量  已用  可用 已用% 挂载点
devtmpfs        1.8G     0  1.8G    0% /dev
tmpfs           1.9G     0  1.9G    0% /dev/shm
tmpfs           1.9G  9.6M  1.8G    1% /run
tmpfs           1.9G     0  1.9G    0% /sys/fs/cgroup
/dev/nvme0n1p1   25G   16G  9.1G   64% /
tmpfs           371M   12K  371M    1% /run/user/42
tmpfs           371M     0  371M    0% /run/user/0
[root@rehat8 ~]# ls /mnt/
hgfs
6.4.2、注释掉对yum的配置使其失效
[root@rehat8 ~]# vim /etc/yum.repos.d/redhat.repo
[root@rehat8 ~]# cat /etc/yum.repos.d/redhat.repo
#
# Certificate-Based Repositories
# Managed by (rhsm) subscription-manager
#
# *** This file is auto-generated.  Changes made here will be over-written. ***
# *** Use "subscription-manager repo-override --help" if you wish to make changes. ***
#
# If this file is empty and this system is subscribed consider
# a "yum repolist" to refresh available repos
#[BaseOS]
#name=BaseOS
#baseurl=file:///mnt/BaseOS
#gpgcheck=0
#enabled=1
#[AppStream]
#name=AppStream
#baseurl=file:///mnt/AppStream
#gpgcheck=0
#enabled=1
[root@rehat8 ~]# yum clean all
[root@rehat8 ~]# yum repolist
6.4.3、尝试安装gcc报错
[root@rehat8 ~]#  yum -y install gcc
正在更新 Subscription Management 软件仓库。
无法读取客户身份
本系统尚未在权利服务器中注册。可使用 subscription-manager 进行注册。
错误:在"/etc/yum.repos.d", "/etc/yum/repos.d", "/etc/distro.repos.d"中没有被启用的仓库。
6.4.4、挂载镜像&恢复yum配置
[root@rehat8 ~]# mount -o loop /zyd/rhel-8.6-x86_64-dvd.iso /mnt/
mount: /mnt: WARNING: device write-protected, mounted read-only.
[root@rehat8 ~]# df -h
文件系统        容量  已用  可用 已用% 挂载点
devtmpfs        1.8G     0  1.8G    0% /dev
tmpfs           1.9G     0  1.9G    0% /dev/shm
tmpfs           1.9G  9.6M  1.8G    1% /run
tmpfs           1.9G     0  1.9G    0% /sys/fs/cgroup
/dev/nvme0n1p1   25G   16G  9.1G   64% /
tmpfs           371M   12K  371M    1% /run/user/42
tmpfs           371M     0  371M    0% /run/user/0
/dev/loop0       11G   11G     0  100% /mnt
[root@rehat8 ~]# ls /mnt/
AppStream  BaseOS  EFI  EULA  extra_files.json  GPL  images  isolinux  media.repo  RPM-GPG-KEY-redhat-beta  RPM-GPG-KEY-redhat-release  TRANS.TBL
[root@rehat8 ~]#
[root@rehat8 ~]# vim /etc/yum.repos.d/redhat.repo
[root@rehat8 ~]# cat /etc/yum.repos.d/redhat.repo
#
# Certificate-Based Repositories
# Managed by (rhsm) subscription-manager
#
# *** This file is auto-generated.  Changes made here will be over-written. ***
# *** Use "subscription-manager repo-override --help" if you wish to make changes. ***
#
# If this file is empty and this system is subscribed consider
# a "yum repolist" to refresh available repos
[BaseOS]
name=BaseOS
baseurl=file:///mnt/BaseOS
gpgcheck=0
enabled=1
[AppStream]
name=AppStream
baseurl=file:///mnt/AppStream
gpgcheck=0
enabled=1
[root@rehat8 ~]#
[root@rehat8 ~]# yum clean all
正在更新 Subscription Management 软件仓库。
无法读取客户身份
本系统尚未在权利服务器中注册。可使用 subscription-manager 进行注册。
0 文件已删除
[root@rehat8 ~]# yum repolist
正在更新 Subscription Management 软件仓库。
无法读取客户身份
本系统尚未在权利服务器中注册。可使用 subscription-manager 进行注册。
仓库 id                                                                                                                                仓库名称
AppStream                                                                                                                              AppStream
BaseOS                                                                                                                                 BaseOS
[root@rehat8 ~]#
6.4.5、安装gcc
好了,现在安装一下gcc测试一下!!!
[root@rehat8 ~]# yum -y install gcc 正在更新 Subscription Management 软件仓库。 无法读取客户身份 本系统尚未在权利服务器中注册。可使用 subscription-manager 进行注册。 BaseOS 131 MB/s | 2.4 MB 00:00 AppStream 220 MB/s | 7.5 MB 00:00 依赖关系解决。 ============================================================================================================================================================================================================================================================================== 软件包 架构 版本 仓库 大小 ============================================================================================================================================================================================================================================================================== 安装: gcc x86_64 8.5.0-10.el8 AppStream 23 M 安装依赖关系: cpp x86_64 8.5.0-10.el8 AppStream 10 M glibc-devel x86_64 2.28-189.1.el8 BaseOS 79 k glibc-headers x86_64 2.28-189.1.el8 BaseOS 483 k isl x86_64 0.16.1-6.el8 AppStream 841 k kernel-headers x86_64 4.18.0-372.9.1.el8 BaseOS 9.3 M libxcrypt-devel x86_64 4.1.1-6.el8 BaseOS 25 k 事务概要 ============================================================================================================================================================================================================================================================================== 安装 7 软件包 总计:45 M 安装大小:98 M 下载软件包: 运行事务检查 事务检查成功。 运行事务测试 事务测试成功。 运行事务 准备中 : 1/1 安装 : isl-0.16.1-6.el8.x86_64 1/7 运行脚本: isl-0.16.1-6.el8.x86_64 1/7 安装 : cpp-8.5.0-10.el8.x86_64 2/7 运行脚本: cpp-8.5.0-10.el8.x86_64 2/7 安装 : kernel-headers-4.18.0-372.9.1.el8.x86_64 3/7 运行脚本: glibc-headers-2.28-189.1.el8.x86_64 4/7 安装 : glibc-headers-2.28-189.1.el8.x86_64 4/7 安装 : libxcrypt-devel-4.1.1-6.el8.x86_64 5/7 安装 : glibc-devel-2.28-189.1.el8.x86_64 6/7 运行脚本: glibc-devel-2.28-189.1.el8.x86_64 6/7 安装 : gcc-8.5.0-10.el8.x86_64 7/7 运行脚本: gcc-8.5.0-10.el8.x86_64 7/7 验证 : glibc-devel-2.28-189.1.el8.x86_64 1/7 验证 : glibc-headers-2.28-189.1.el8.x86_64 2/7 验证 : kernel-headers-4.18.0-372.9.1.el8.x86_64 3/7 验证 : libxcrypt-devel-4.1.1-6.el8.x86_64 4/7 验证 : cpp-8.5.0-10.el8.x86_64 5/7 验证 : gcc-8.5.0-10.el8.x86_64 6/7 验证 : isl-0.16.1-6.el8.x86_64 7/7 已更新安装的产品。 已安装: cpp-8.5.0-10.el8.x86_64 gcc-8.5.0-10.el8.x86_64 glibc-devel-2.28-189.1.el8.x86_64 glibc-headers-2.28-189.1.el8.x86_64 isl-0.16.1-6.el8.x86_64 kernel-headers-4.18.0-372.9.1.el8.x86_64 libxcrypt-devel-4.1.1-6.el8.x86_64 完毕! [root@rehat8 ~]#
好嘞,上面安装成功没问题啦!!!
总结
这是一篇非常详细的介绍如何通过VMware安装redhat8操作系统的文章。
以此为前提,给大家介绍了在没有yum源的内网环境中如何通过挂载系统镜像来制作yum源。
文章篇幅很大,甚至对熟悉linux的人来说这是一个太罗嗦的文章,但是博主创做每篇技术文章的时候,都是本着技术小白也能从头到尾看着一步步成功做下来的目标去创作的。
这类部署式的文章,我认为这样才是最友好的。因为博主也是从小白走过来的,特别反感惜字如金和写一半丢一半的技术文章。
本文由傻鸟发布,不代表傻鸟立场,转载联系作者并注明出处:https://shaniao.net/linux/157.html

