1.Apollo安装
Apollo架构
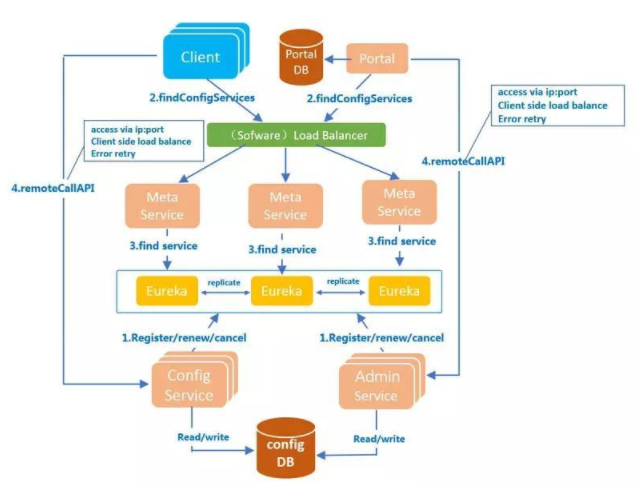
如图主要分为三个模块
ConfigService、AdminService、Portal,围绕着三个进行环境搭建
Jar包及脚本准备
搭建版本为Apollo 2.0.0-RC1 Release版本 ,其余版本自行下载
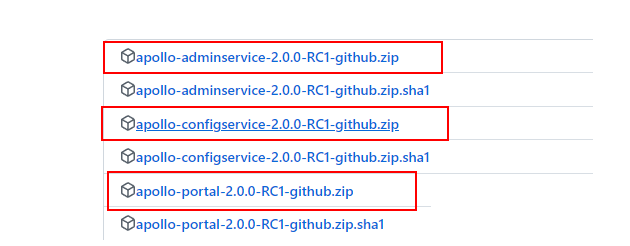
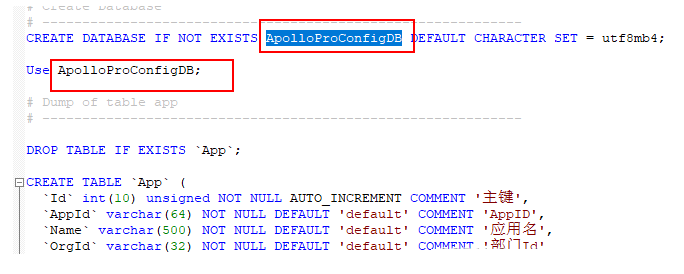
Apollo依赖于数据库,准备好脚本文件,直接上gitee搜索apollo
脚本文件所在目录
scripts/sql
下载 apolloconfigdb.sql和apolloportaldb.sql,导入到数据库
修改配置文件
adminservice配置
根据自己存放的位置进行查找
首先是adminservice的配置文件,目录地址: apollo-adminservice-2.0.0-RC1-github\config\application-github.properties
添加数据库连接配置
spring.datasource.url = jdbc:mysql://localhost:3306/ApolloConfigDB?characterEncoding=utf8
spring.datasource.username = root
spring.datasource.password = 123456
configservice配置
spring.datasource.url = jdbc:mysql://localhost:3306/ApolloConfigDB?characterEncoding=utf8
spring.datasource.username = root
spring.datasource.password = 123456
protal
spring.datasource.url = jdbc:mysql://localhost:3306/ApolloPortalDB?characterEncoding=utf8
spring.datasource.username = root
spring.datasource.password = 123456

server.port=8070
启动jar包
admin默认占用8090
config默认占用8080
protal占用8070
启动命令,在对应的目录
# admin
java -jar apollo-adminservice-2.0.0-RC1.jar

# config
java -jar apollo-configservice-2.0.0-RC1.jar

# protal  这里的-Ddev_meta=http://localhost:8080 开发环境获取数据位置 -Dserver.port指定端口
java -Ddev_meta=http://localhost:8080 -Dserver.port=8070 -jar apollo-portal-2.0.0-RC1.jar
protal当然也可以直接修改一下配置,在protal的config文件夹下面有 apollo-env.properties,自带了几个地址,稍微修改一下就可以
local.meta=http://localhost:8080
dev.meta=http://localhost:8080
fat.meta=http://fill-in-fat-meta-server:8080
uat.meta=http://fill-in-uat-meta-server:8080
lpt.meta=${lpt_meta}
pro.meta=http://fill-in-pro-meta-server:8081
修改完执行运行命令, 照样正常启动
java -jar apollo-portal-2.0.0-RC1.jar
启动之后访问
访问8070端口
用户名 apollo
密码 admin
初始是没有应用的

在创建应用之前可以先看一下系统的一些配置参数信息

如图输入组织信息查询,如果要修改只需要在value里面写入值 进行覆盖就可以,
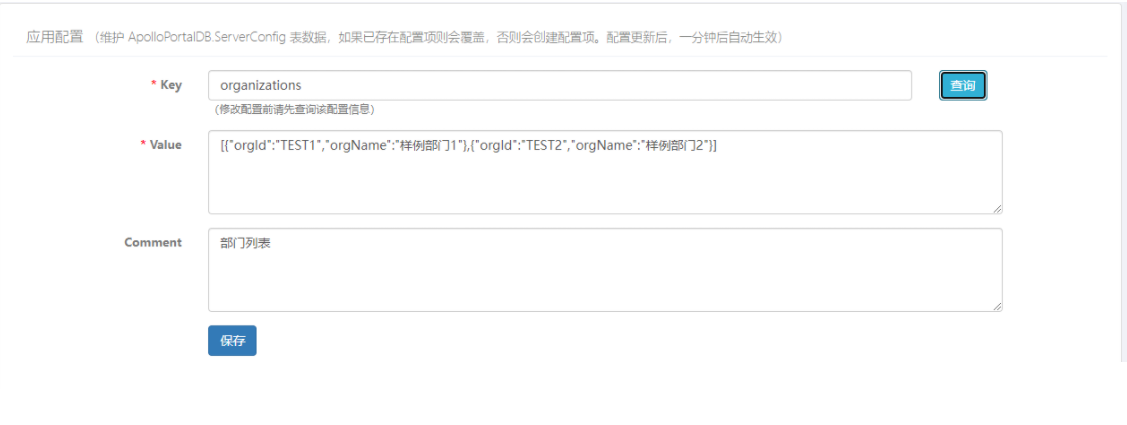
能查询那些key 我们可以看数据库, apolloportaldb的serverconfig表

可以不做修改继续进行创建,下面的应用负责人及应用管理员可以自行在管理员工具 那里添加,这里就不演示了
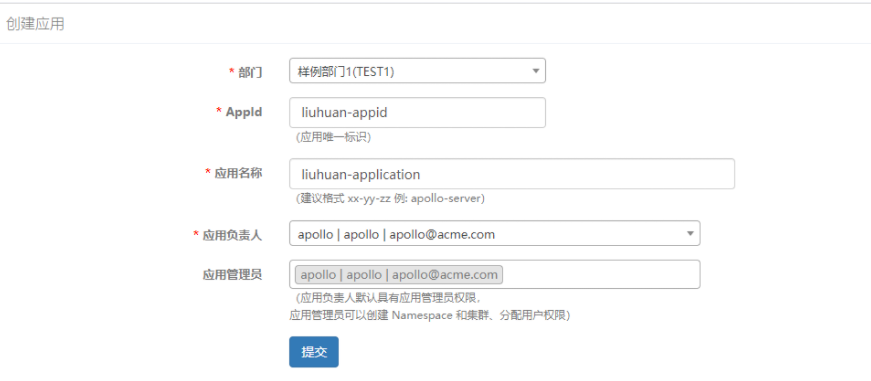
提交之后新增配置
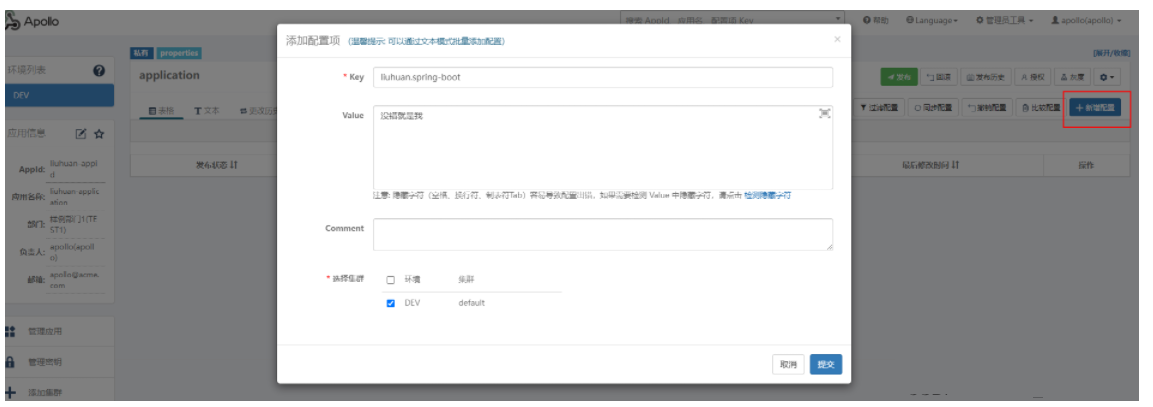
新增的配置需要进过发布才能使用,点击发布

2.java基本使用
maven依赖
    <dependencies>
        <!-- https://mvnrepository.com/artifact/com.ctrip.framework.apollo/apollo-client -->
        <dependency>
            <groupId>com.ctrip.framework.apollo</groupId>
            <artifactId>apollo-client</artifactId>
            <version>2.0.0-RC1</version>
        </dependency>

    </dependencies>
项目结构
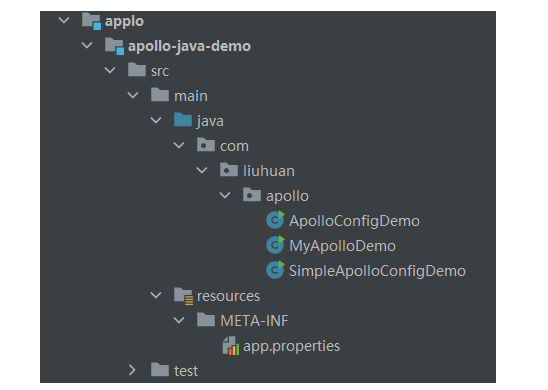
编写配置和代码运行
app.properties 内容,这些我们也可以在启动的时候通过运行参数添加
# 指定应用id  上面创建时候的
app.id=liuhuan-appid
# 指定访问数据的地址 上面配置的
apollo.meta=http://localhost:8080
编写测试代码
public class MyApolloDemo {

    public static void main(String[] args) {
        Config appConfig = ConfigService.getAppConfig();
        // 这里可以获取指定namespace下面的配置,目前我们没有配置
        // Config config = ConfigService.getConfig("liuhuan-application");
        while (true){
            SleepUtils.sleepSeconds(1);
            String property = appConfig.getProperty("liuhuan.spring-boot", "zs");
            System.out.println(property);
        }
    }
}
查看运行结果

app.peoperties的内容也可以在启动的时候,由java运行参数来定义
-Dapp.id=liuhuan-appid -Denv=dev -Ddev_meta=http://localhost:8080
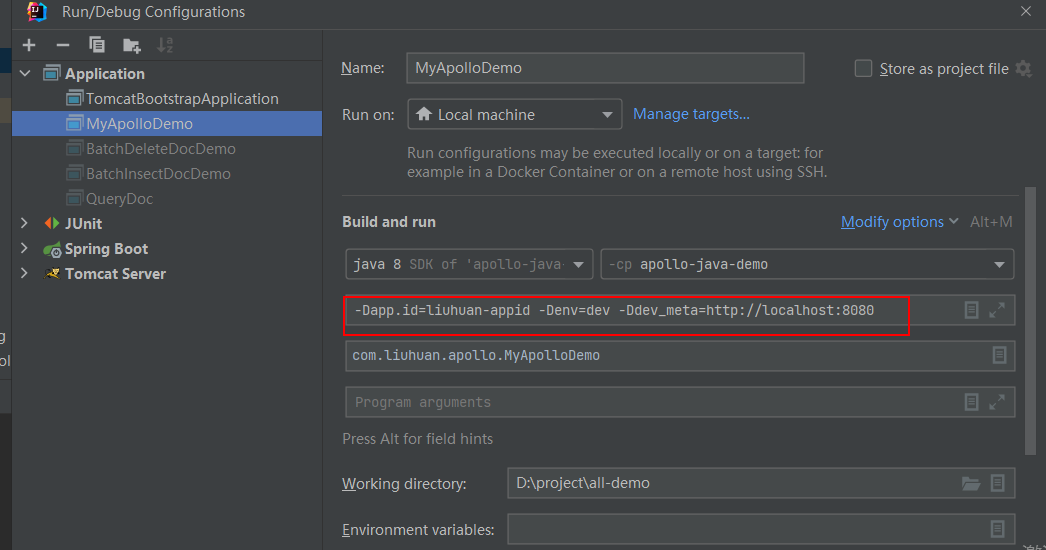
查看运行结果,一样能获取到数据
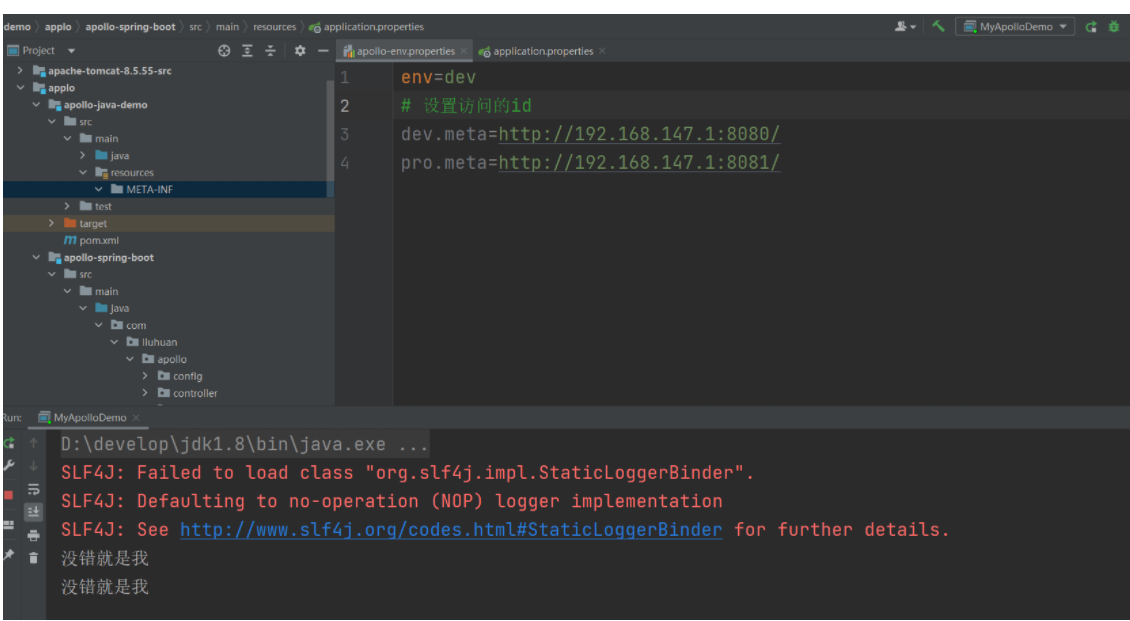
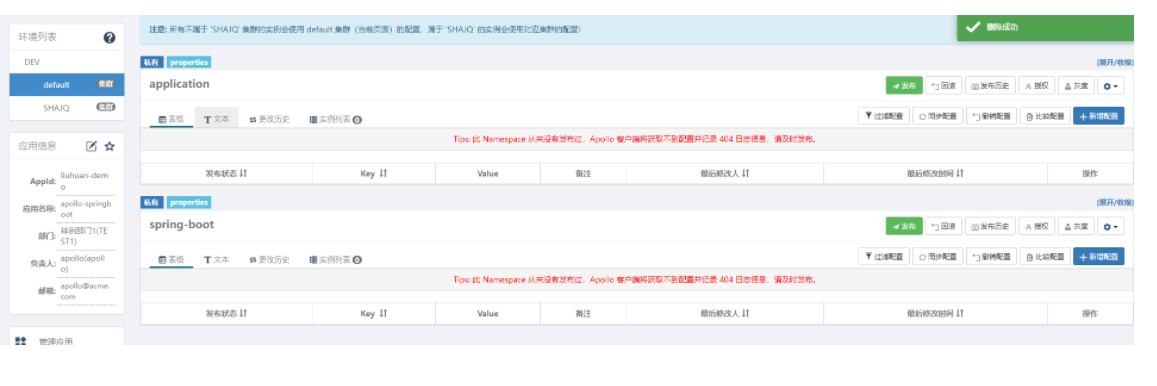
3.apollo的集群和namespace功能
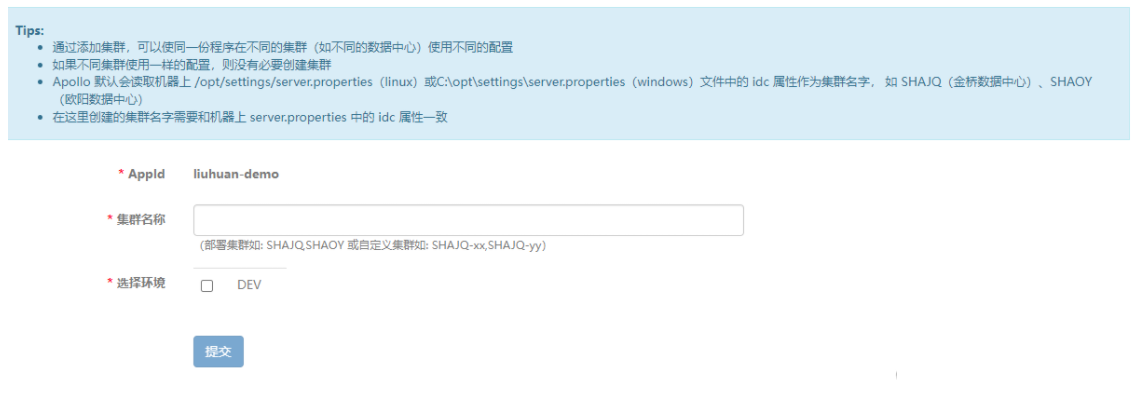
新建集群
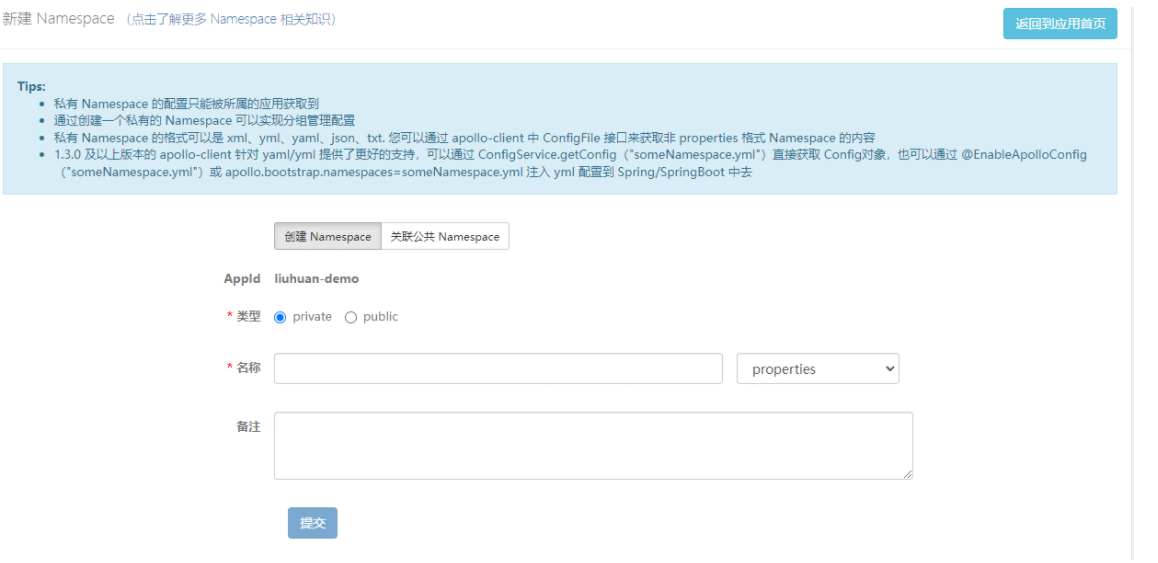
新建namespace
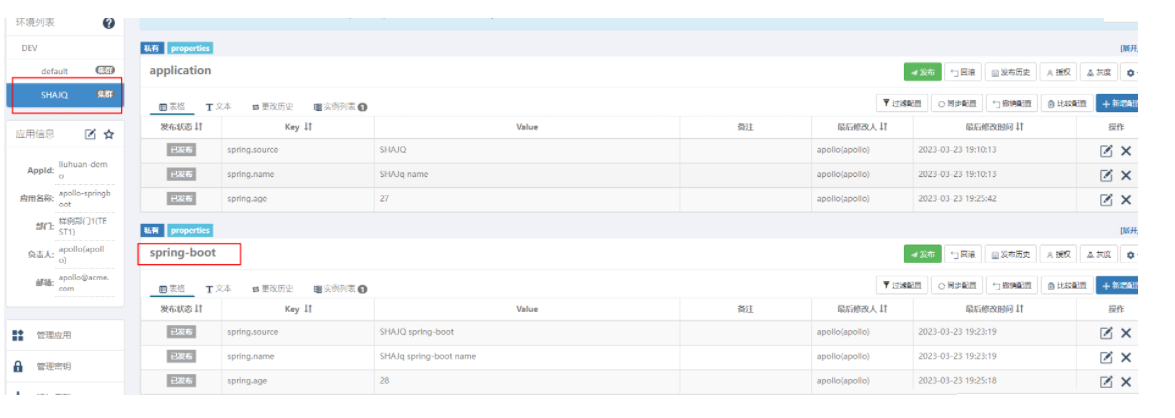
可以看到多了一个SHAJQ的集群,同时也多了一个spring-boot的namespace
同步配置功能

点击SHAJQ下面的application下面的同步配置,将其同步到Dev下面
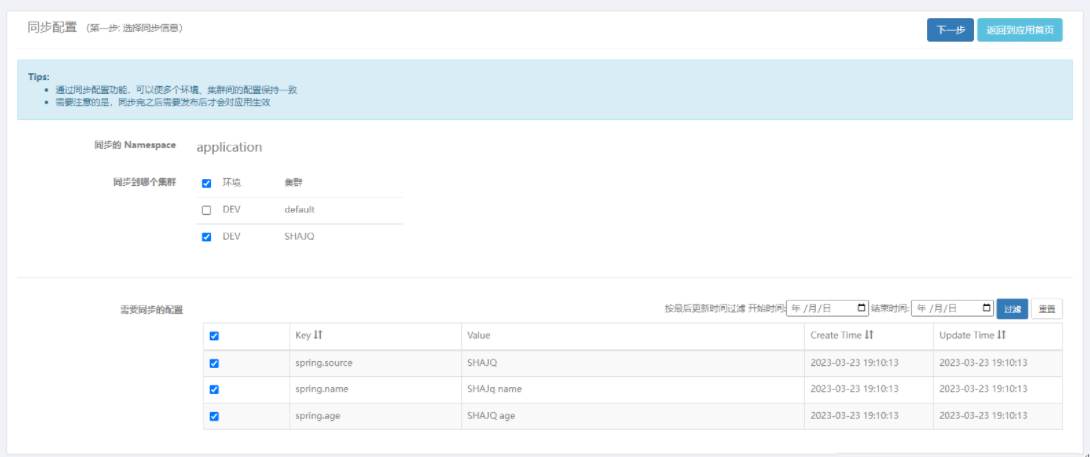
同步完成,同步完之后,dev环境的配置也需要发布才能使用

4.springboot使用方式
发布配置
spring.source = SHAJQ spring-boot
spring.name = SHAJq  spring-boot name
spring.age = 28
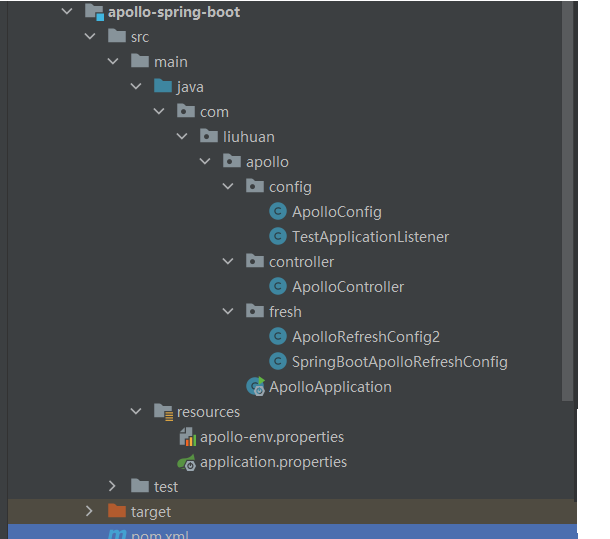
项目结构
pom依赖
    <dependencies>
        <dependency>
            <groupId>org.springframework.boot</groupId>
            <artifactId>spring-boot-starter</artifactId>
            <version>2.6.5</version>
        </dependency>

        <dependency>
            <groupId>org.springframework.boot</groupId>
            <artifactId>spring-boot-starter-web</artifactId>
            <version>2.6.5</version>
        </dependency>

        <dependency>
            <groupId>com.ctrip.framework.apollo</groupId>
            <artifactId>apollo-client</artifactId>
            <version>2.0.0-RC1</version>
        </dependency>
        <dependency>
            <groupId>org.springframework.cloud</groupId>
            <artifactId>spring-cloud-context</artifactId>
            <version>3.1.3</version>
        </dependency>

        <dependency>
            <groupId>org.projectlombok</groupId>
            <artifactId>lombok</artifactId>
            <version>1.18.24</version>
        </dependency>

        <dependency>
            <groupId>org.springframework.boot</groupId>
            <artifactId>spring-boot-configuration-processor</artifactId>
            <version>2.6.5</version>
        </dependency>

        <dependency>
            <groupId>org.liuhuan</groupId>
            <artifactId>commons</artifactId>
            <version>0.1.0</version>
        </dependency>

    </dependencies>

    <build>
        <plugins>
            <plugin>
                <groupId>org.apache.maven.plugins</groupId>
                <artifactId>maven-compiler-plugin</artifactId>
                <configuration>
                    <source>1.8</source>
                    <target>1.8</target>
                </configuration>
            </plugin>
            <plugin>
                <groupId>org.springframework.boot</groupId>
                <artifactId>spring-boot-maven-plugin</artifactId>
                <version>2.6.5</version>
                <configuration>
                    <!-- 指定该Main Class为全局的唯一入口 -->
                    <mainClass>com.liuhuan.apollo.ApolloApplication</mainClass>
                </configuration>
                <executions>
                    <execution>
                        <goals>
                            <goal>repackage</goal><!--可以把依赖的包都打包到生成的Jar包中-->
                        </goals>
                    </execution>
                </executions>
            </plugin>
        </plugins>
    </build>
配置文件
# 使用的环境
env=dev
# 设置访问的开发数据的地址
dev.meta=http://localhost:8080/
# 设置访问的生产数据地址 用于等下演示环境
pro.meta=http://localhost:8081/
application.peoperties
server.port=7987
# app.id 需要和apollo配置的一直
app.id=liuhuan-demo
# 取apollo配置
apollo.bootstrap.enabled=true
# 将 Apollo 加载提到初始化日志系统之前,如果设置为 false,
# 那么将打印出 Apollo 的日志信息,但是由于打印 Apollo 日志信息需要日志先启动,
# 启动后无法对日志配置进行修改,所以 Apollo 不能管理应用的日志配置,如果设置为 true,
# 那么 Apollo 可以管理日志的配置,但是不能打印出 Apollo 的日志信息
apollo.bootstrap.eagerLoad.enabled=true
apollo.bootstrap.namespaces=spring-boot
# 使用哪个集群配置
apollo.cluster=SHAJQ
spring.application.name=apollo-springboot
# Spring应用通常会使用 Placeholder 来注入配置,如${someKey:someDefaultValue},
# 冒号前面的是 key,冒号后面的是默认值。如果想关闭 placeholder 在运行时自动更新功能,可以设置为 false
apollo.autoUpdateInjectedSpringProperties=true
apollo.meta= http://localhost:8080
启动类及演示代码
@SpringBootApplication
// 使用apollo
@EnableApolloConfig
// 支持@ConfigurationProperties 配置
@EnableConfigurationProperties
public class ApolloApplication {

    public static void main(String[] args) {
        SpringApplication.run(ApolloApplication.class,args);
    }
}
配置类
@Component("apolloConfig")
@Data
@AllArgsConstructor
@NoArgsConstructor
public class ApolloConfig {

    @Value("${spring.source}")
    private String source;
    @Value("${spring.name}")
    private String name;
    @Value("${spring.age}")
    private Integer age;
}
controller
@RestController
@RequestMapping("/apollo")
public class ApolloController {

    @Value("${name:aaa}")
    private String old;

    @Autowired
    private ApolloConfig apolloConfig;

    @GetMapping("/config")
    public String getApolloConfig(){
        return apolloConfig.toString();
    }
}
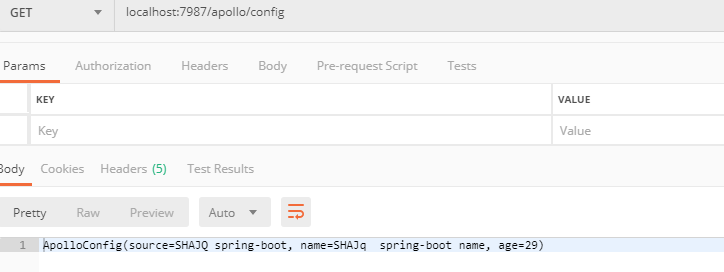
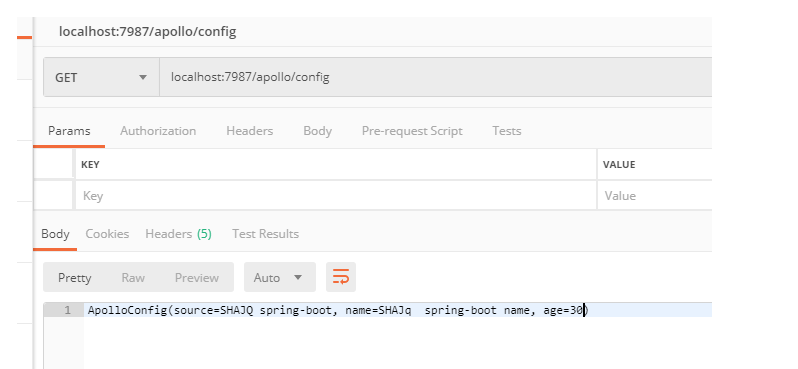
postman测试
5.动态刷新
问题
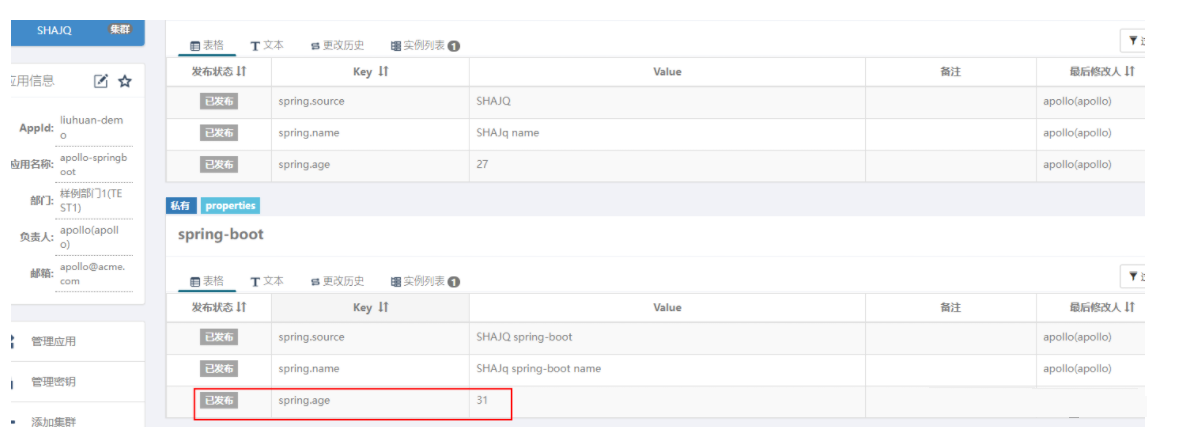
访问结果
解决
方式一
@Component
@Slf4j
public class SpringBootApolloRefreshConfig implements ApplicationContextAware {
    private ApplicationContext applicationContext;
    // interestedKeyPrefixes = {"redis.cache."}
    @ApolloConfigChangeListener(value = "spring-boot.properties")
    public void onChange(ConfigChangeEvent changeEvent) {
      boolean propertiesChanged = false;

      for (String changedKey : changeEvent.changedKeys()) {
        ConfigChange change = changeEvent.getChange(changedKey);
        log.info("Change-key: {}, oldValue: {}, newValue: {}, changeType: {}",
                change.getPropertyName(),change.getOldValue(),
                change.getNewValue(), change.getChangeType());
        //jobinfo的key发生了改变
        if (changedKey.startsWith("spring.")) {
          propertiesChanged = true;
        }
      }
      //更新jobinfo的值
      if (propertiesChanged) {
        refreshProperties(changeEvent);
      }
    }

  private void refreshProperties(ConfigChangeEvent changeEvent){
    long startTime = System.currentTimeMillis();
    // 更新配置
    this.applicationContext.publishEvent(new EnvironmentChangeEvent(changeEvent.changedKeys()));
    long finishTime = System.currentTimeMillis() - startTime;
    log.info("更新数据完成!耗时:" + finishTime + "ms");
  }
    @Override
    public void setApplicationContext(ApplicationContext applicationContext) throws BeansException {
      this.applicationContext = applicationContext;
    }
}
方式二
@Component("apolloConfig")
@ConfigurationProperties(prefix = "spring")
@RefreshScope
@Data
@AllArgsConstructor
@NoArgsConstructor
public class ApolloConfig {

    private String source;

    private String name;

    private Integer age;
}
动态修改代码
@Component
@Slf4j
public class ApolloRefreshConfig2 {
    @Resource
    private RefreshScope refreshScope;

    @ApolloConfigChangeListener(value = "spring-boot.properties")
    public void onChange(ConfigChangeEvent changeEvent) {
        boolean propertiesChanged = false;
        for (String changedKey : changeEvent.changedKeys()) {
            ConfigChange change = changeEvent.getChange(changedKey);
            log.info("Change-key: {}, oldValue: {}, newValue: {}, changeType: {}",
                    change.getPropertyName(),change.getOldValue(),
                    change.getNewValue(), change.getChangeType());
            //jobinfo的key发生了改变
            if (changedKey.startsWith("spring.")) {
                propertiesChanged = true;
//                break;
            }
        }
        //更新jobinfo的值
        if (propertiesChanged) {
            refreshProperties(changeEvent);
        }
    }

    private void refreshProperties(ConfigChangeEvent changeEvent){
        long startTime = System.currentTimeMillis();
        // 更新配置
        refreshScope.refresh("apolloConfig");
        long finishTime = System.currentTimeMillis() - startTime;
        log.info("更新数据完成!耗时:" + finishTime + "ms");
    }
}
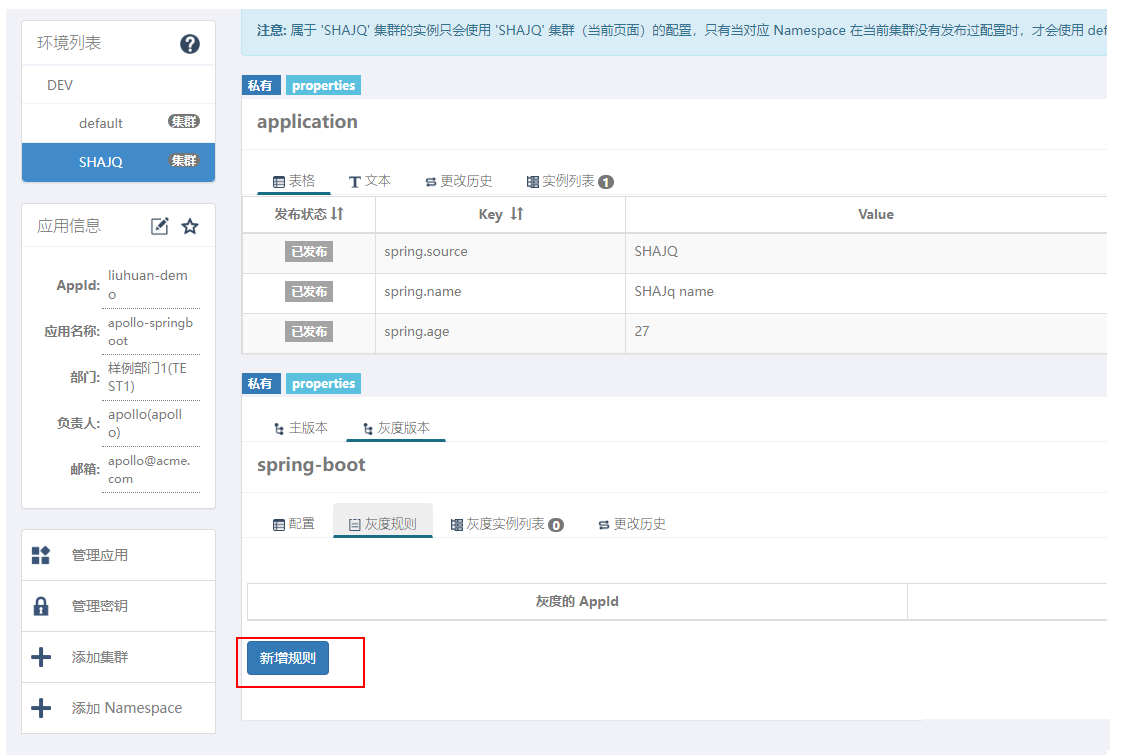
6.灰度发布
创建灰度版本

修改灰度配置

新增灰度规则
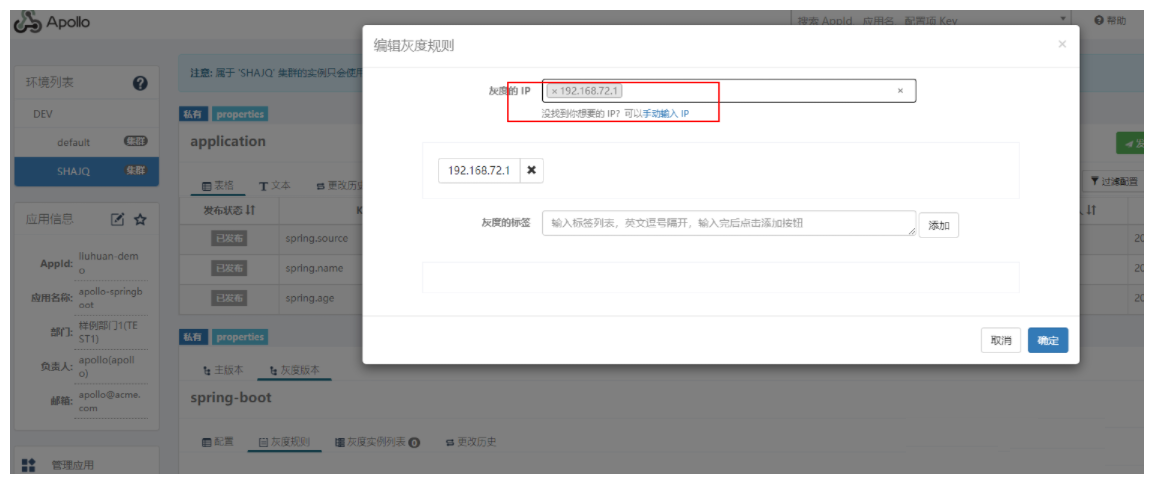
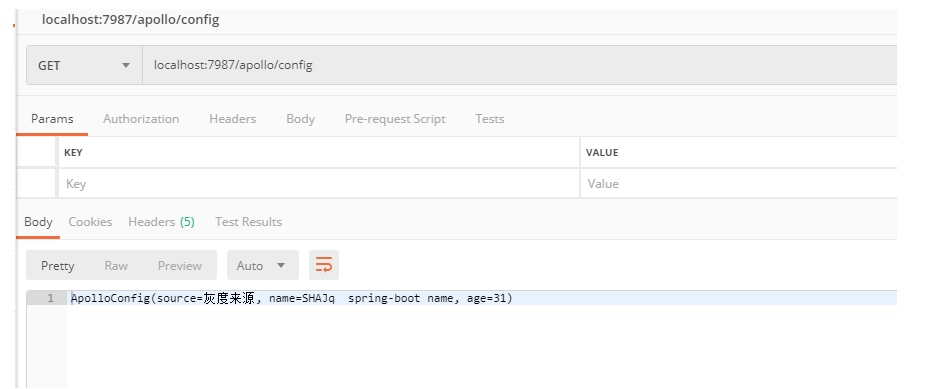
访问
7. 两套环境
Pro环境
spring.datasource.url = jdbc:mysql://localhost:3306/ApolloProConfigDB?characterEncoding=utf8
spring.datasource.username = root
spring.datasource.password = 123456
update serverconfig set `Value` = 'http://localhost:8081/eureka/' where `Key` = 'eureka.service.url';
启动config、admin的jar包
java -Dserver.port=8091 -jar apollo-adminservice-2.0.0-RC1.jar

java -Dserver.port=8081 -jar apollo-configservice-2.0.0-RC1.jar
关闭protal服务,重新启动
java -Dapollo_profile=github,auth -Ddev_meta=http://localhost:8080/ -Dpro_meta=http://localhost:8081 -Dserver.port=8070 -jar apollo-portal-2.0.0-RC1.jar
启动成功之后访问
http://localhost:8070/
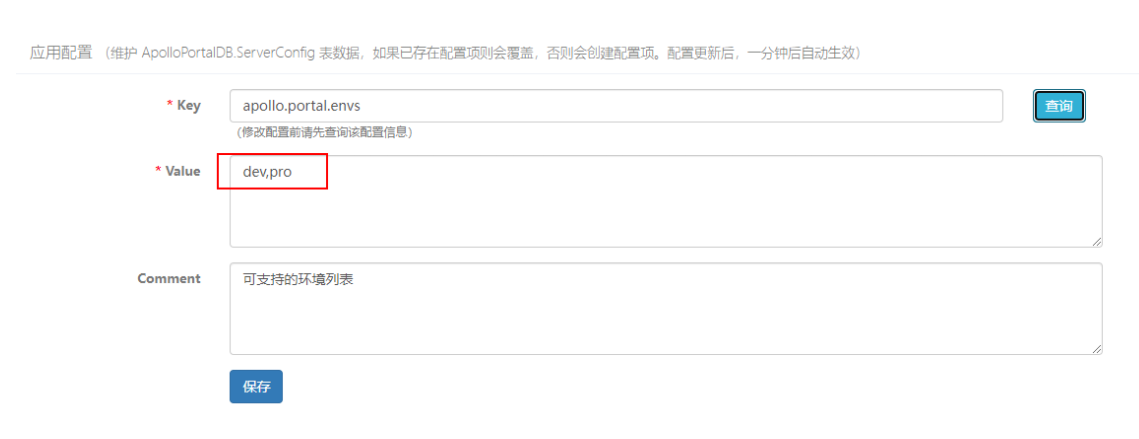
修改环境配置 apollo.portal.envs 加上pro
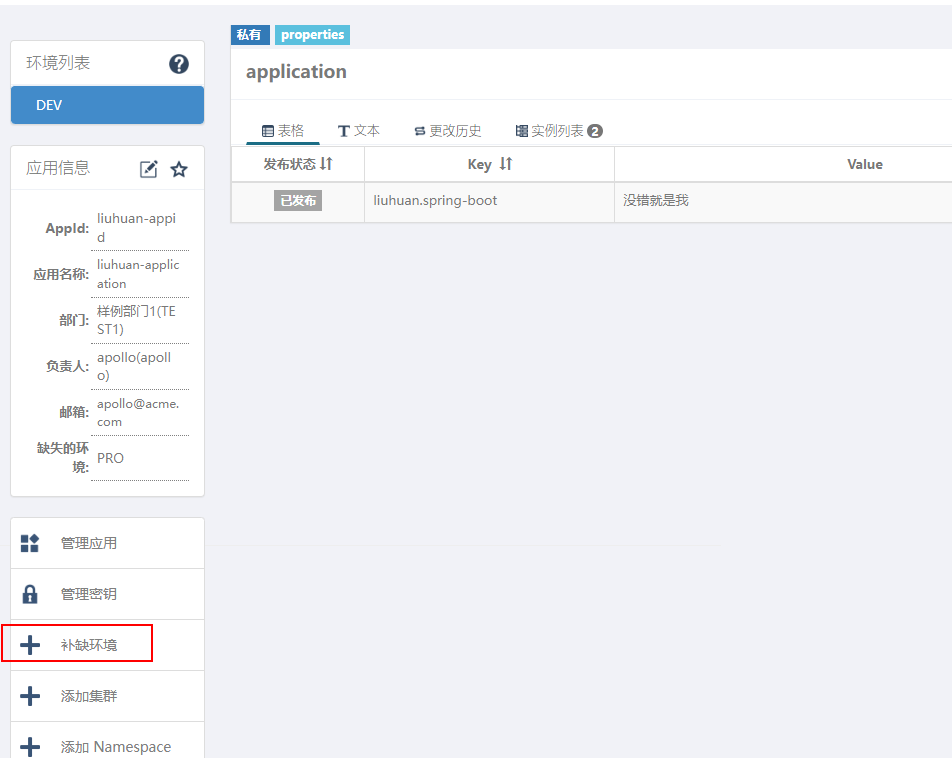
刷新页面,随便点击上面创建好的应用,右边会提示补全环境和namespace
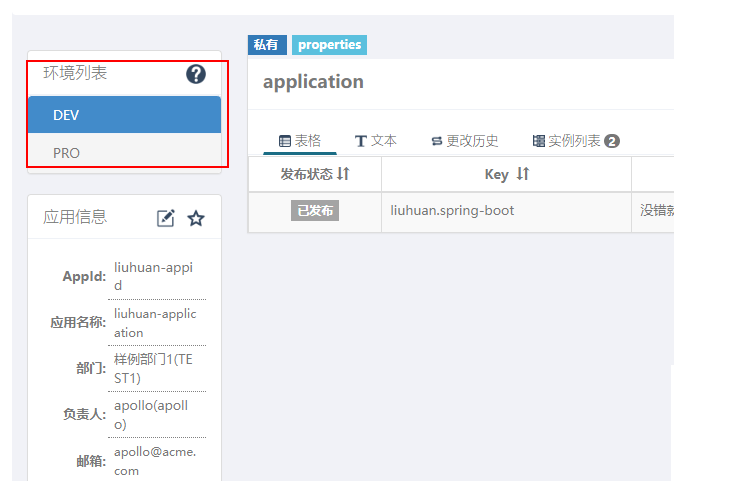
最终效果
Apollo 官方网站:
https://www.apolloconfig.com/
本文由傻鸟发布,不代表傻鸟立场,转载联系作者并注明出处:https://shaniao.net/jishu/310.html

